¶ Laser & Beam Issues
¶ 1. How to Resolve Severely Reduced Cutting Performance of the Swift Laser Module
Solutions:
-
Normal power attenuation: Laser modules naturally lose power over time. This can be compensated by increasing power or reducing the cutting speed.
-
Check laser focus: Re-focus using the fixed-focus knob at the bottom of the laser module. The correct focus height is 4mm (distance from the laser module's bottom frame to the material).

-
Check parameter settings: Verify that your settings match the recommended parameter table. Ensure the speed unit is mm/min. To view the Swift parameter table: ① scan the QR code on the machine, ② visit https://atomstack.com/pages/product-support, or ③ contact customer service.
-
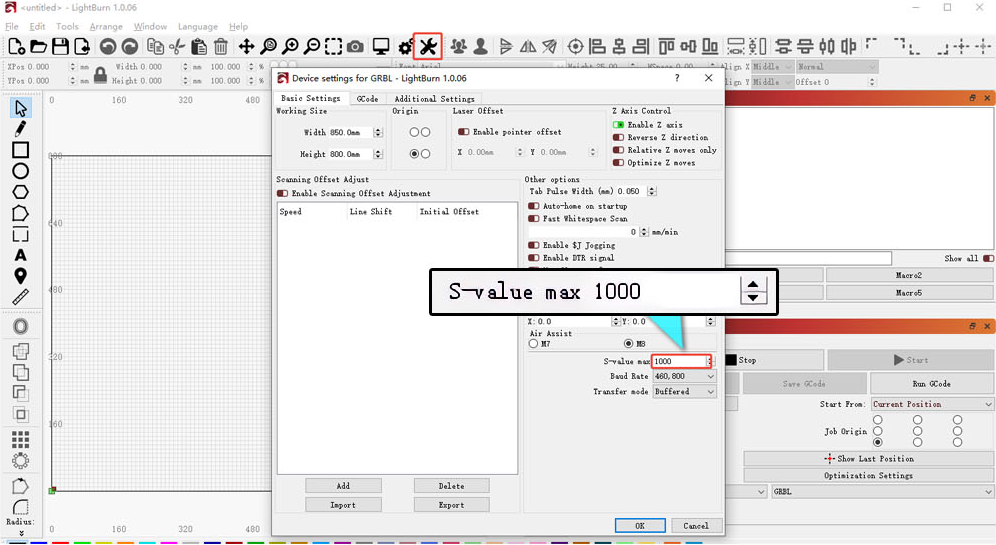
Check the maximum S-value in software: If using LightBurn, confirm the maximum S-value is set to 1000 and has not been modified.
- Check for air nozzle obstruction: If using the F40 air assist with the air guide, ensure the guide is installed correctly and not blocking the laser output.
- Check window and focus lenses for dirt or damage: Disconnect power, remove the laser module, and inspect the lenses. If dirty, refer to the "Cleaning Window Lens & Focus Lens" section.
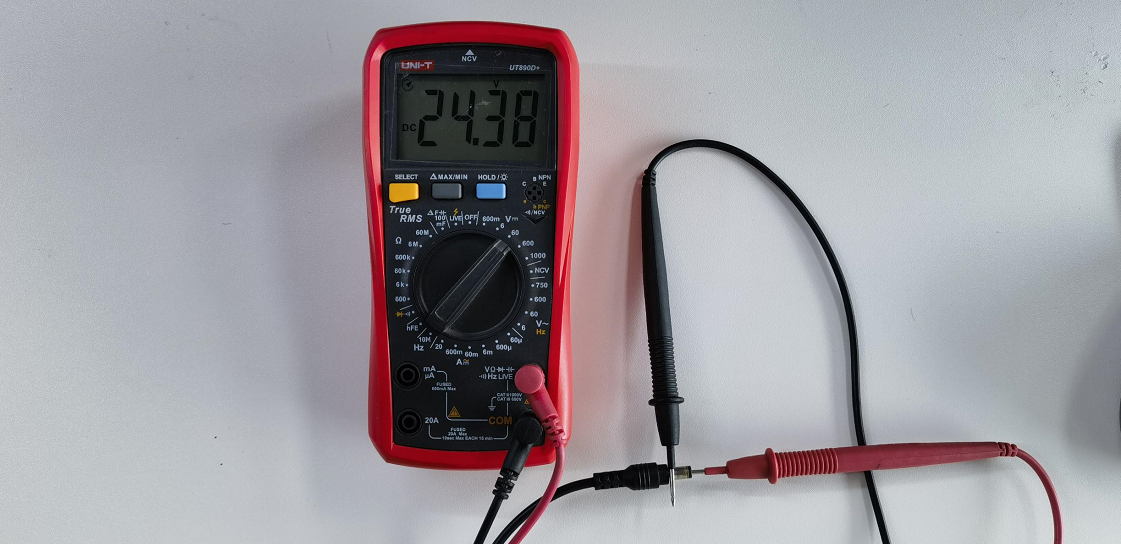
- Check the power adapter output: Use a multimeter (DC mode) to measure whether the adapter outputs 24V, 1.5A (7W) or 24V, 2A (12W).
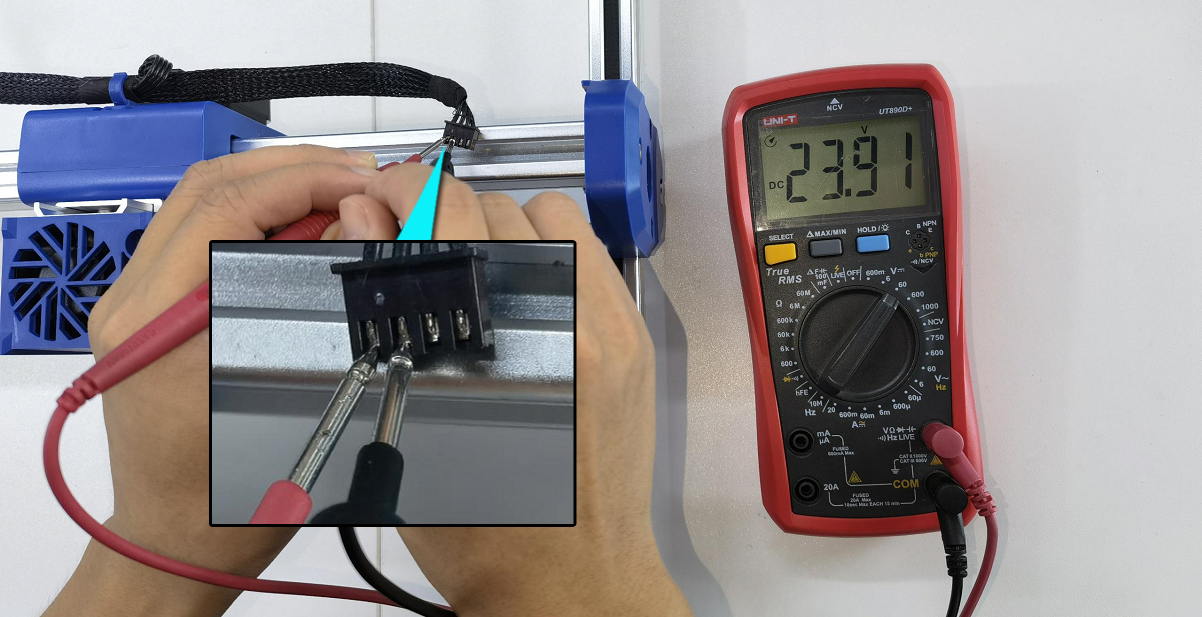
- Check the laser module connector voltage: Unplug the laser cable, run a cutting job at 100% power and 1mm/min, then measure the connector voltage — Pins 1-2 should be 24V, Pins 2-3 should be ≥1V. If Pins 1-2 read below 20V or 0V, or Pins 2-3 read below 1V or 0V, this indicates a motherboard or cable fault. Please send customer service a fault video, a voltage test video, and a photo of the machine's Serial Number. Refer to the laser connector voltage test video, Swift motherboard replacement video, and Swift motherboard cable replacement video.

Click to play video on YouTube

Click to play video on YouTube

Click to play video on YouTube
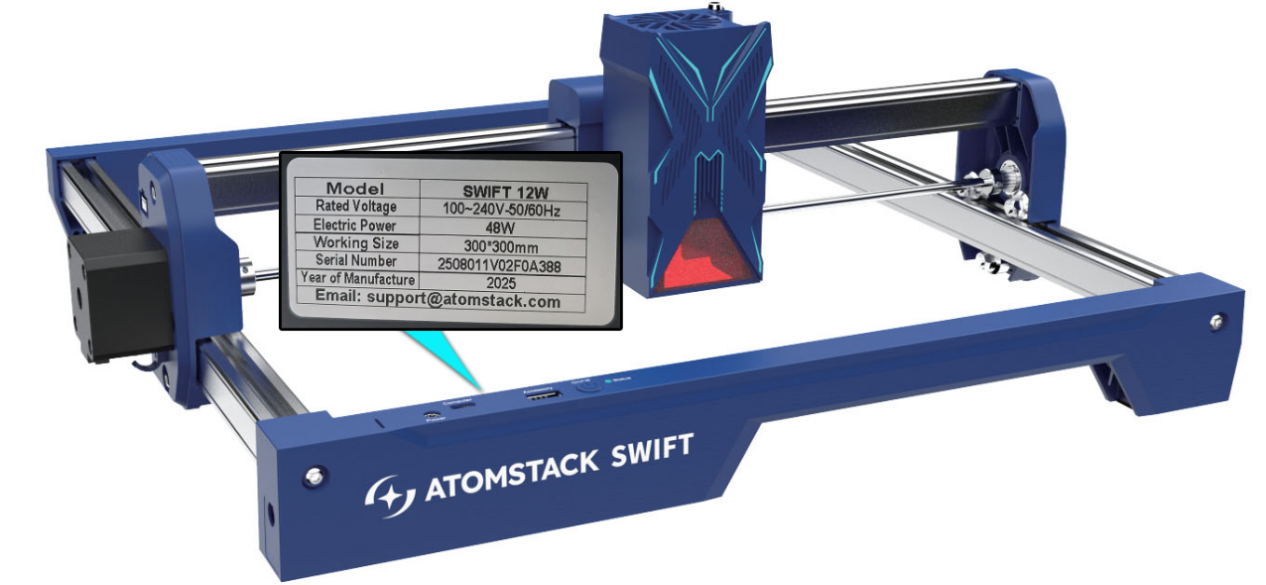
- Abnormal power degradation: If all checks are normal (Pins 1-2 ≥ 20V, Pins 2-3 ≥ 1V), the laser module is experiencing abnormal power degradation. Please provide customer service with a cutting video showing the parameters used, the cutting process, and the cutting results, along with the laser module's engraving code. Refer to the Swift Laser Module Replacement Video.

Click to play video on YouTube
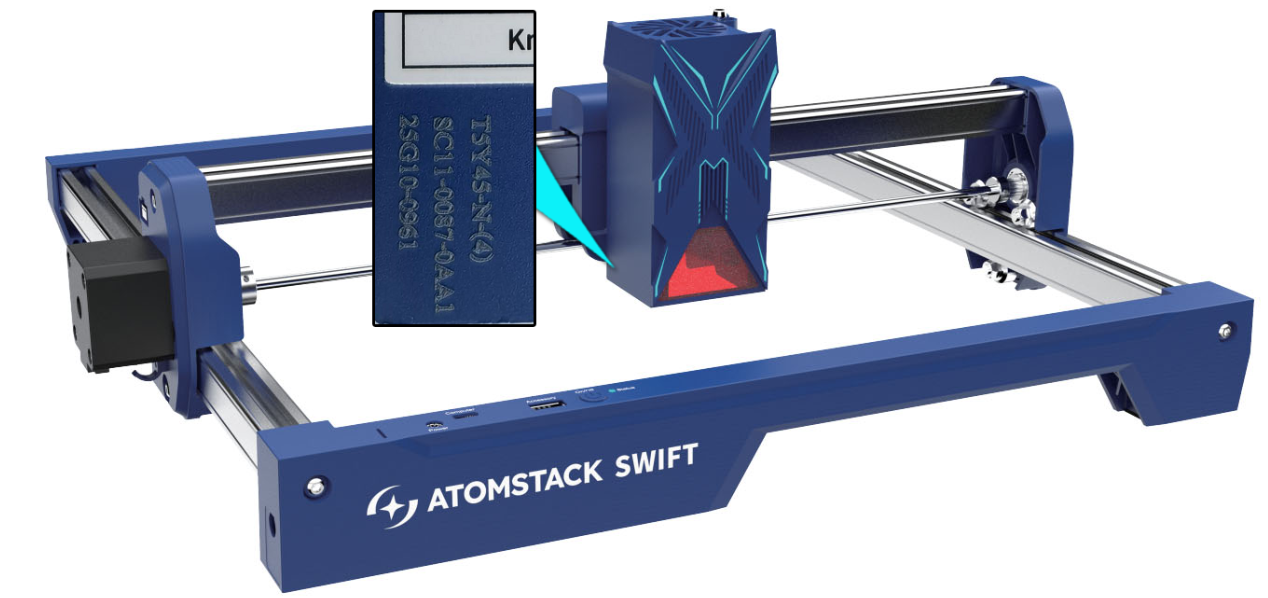
¶ 2. How to Solve the Issue When the Swift Laser Moves but Does Not Emit Light
Solutions:
- Check the laser connector: Turn off the power, unplug the laser connector, then plug it back in and check if the issue is resolved.
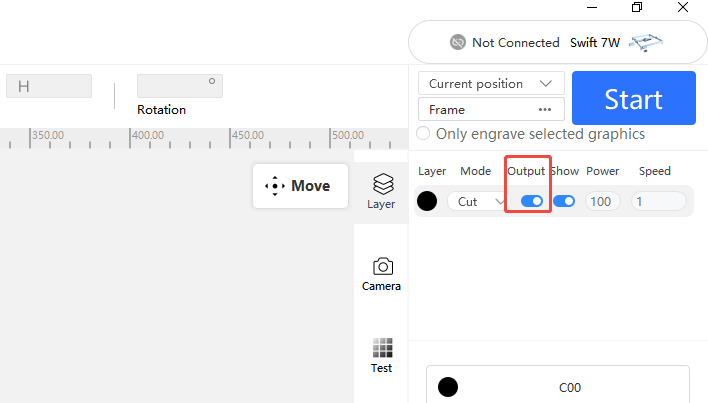
- Check software parameter settings: Set parameters according to the parameter table. Ensure the "Output" option for the layer is turned on.
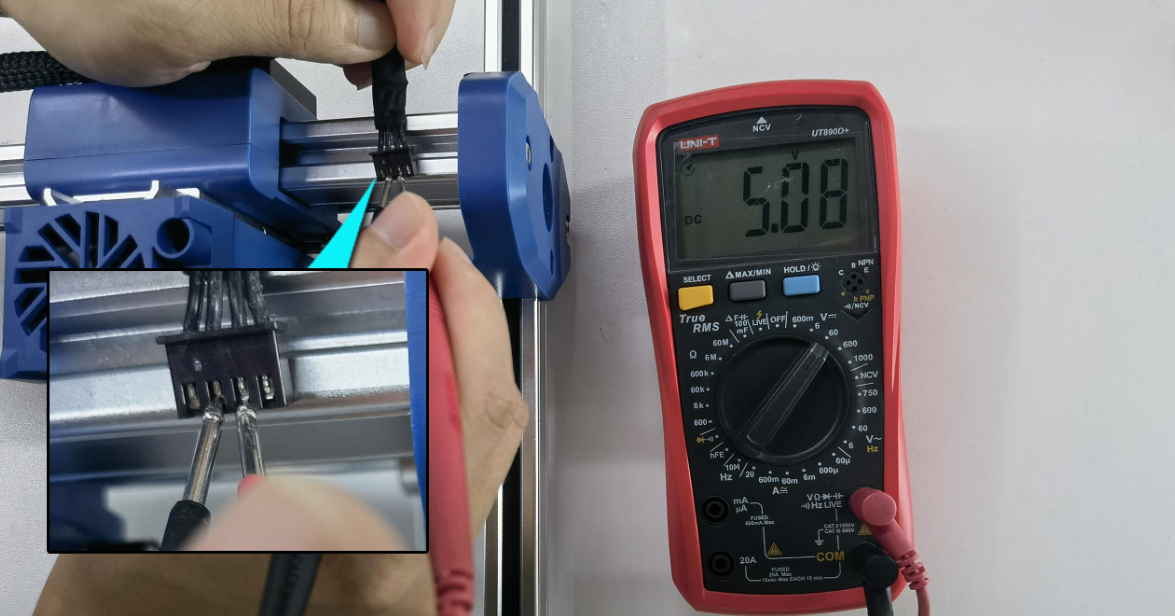
- Check the adapter output: Measure the adapter output using a multimeter in DC mode; it should be 24V, 1.5A (7W) or 24V, 2A (12W).
- Check the laser connector voltage: Unplug the laser cable, run a cutting job at 100% power and 1mm/min, then measure the connector voltage — Pins 1-2 should be 24V, Pins 2-3 should be ≥1V. If Pins 1-2 read below 20V or 0V, or Pins 2-3 read below 1V or 0V, there may be a motherboard or cable fault. Refer to the laser connector voltage test video, Swift motherboard replacement video, and Swift motherboard cable replacement video.
- Laser module fault: If the problem persists and the connector voltage is normal, the laser module may be faulty. Provide a fault video showing the set parameters, the cutting/engraving process, and the laser's serial engraving code to customer service for assistance.
¶ 3. How to Solve the Issue When the Laser Emits Light but the Fan Does Not Spin
Solution:
Remove the 4 screws on the back of the laser, open the casing, take out the fan, and connect it to the adapter using two wires to test if it spins.
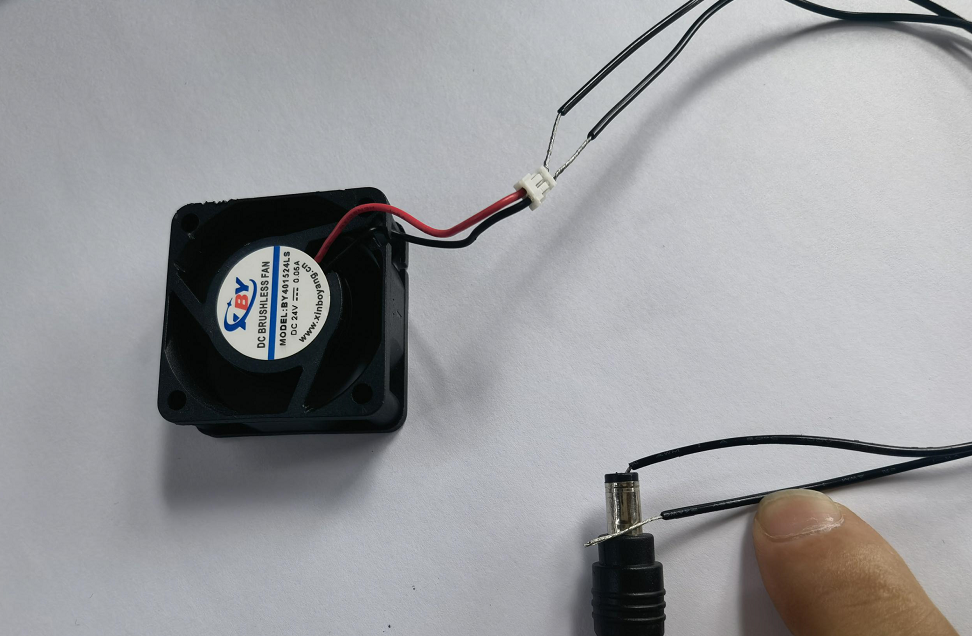
- If the fan still does not spin: The fan is faulty. Send the laser serial code and a troubleshooting video to customer service. Refer to the Swift Laser Fan Replacement Video for guidance.

Click to play video on YouTube
- If the fan spins normally: The laser driver board is faulty. Send the laser serial code and troubleshooting video to customer service.
¶ 4. How to Solve Overheating During Engraving
Solutions:
- Check if the laser fan spins: During engraving, observe if the fan spins. If it does not spin while the laser fires normally, remove the 4 screws, take out the fan, and connect it to the adapter to test. If it spins with the adapter, the driver board is faulty. If it still does not spin, the fan is faulty. Send the serial code and a troubleshooting video to customer service. Refer to the Swift Laser Driver Board Replacement Video and Swift Laser Fan Replacement Video.
- Check if the fan is installed correctly: Observe the fan's center label. If the label is facing up, the fan is installed incorrectly — reinstall it with the label facing down toward the tube core, following the Swift Laser Fan Replacement Video.
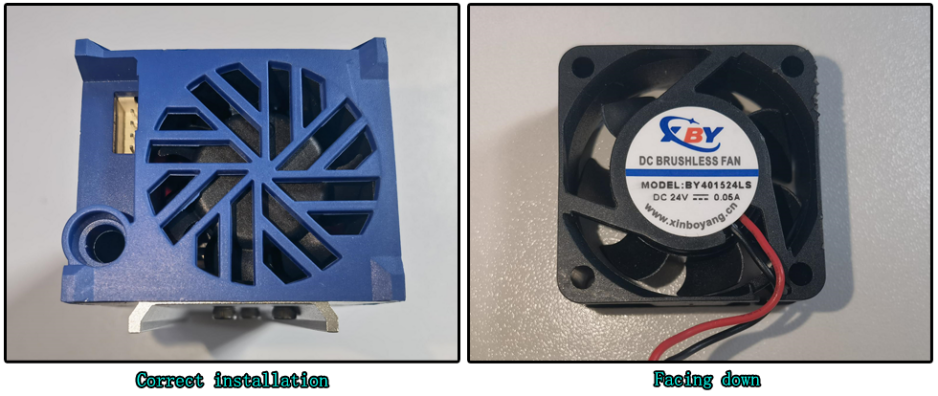
- Check window and focus lenses for dirt or damage: Dirty or damaged lenses can block laser energy, causing overheating and even burning out the laser. Clean or address per the "Cleaning Window Lens & Focus Lens" section immediately if found.
- Check internal cleanliness: Dust buildup inside the laser can hinder heat dissipation. Refer to the Swift Laser Internal Dust Cleaning Video.

Click to play video on YouTube
- Check air guide installation: Remove the air guide and test again — if overheating stops, the air guide was installed at an angle; reinstall it properly.
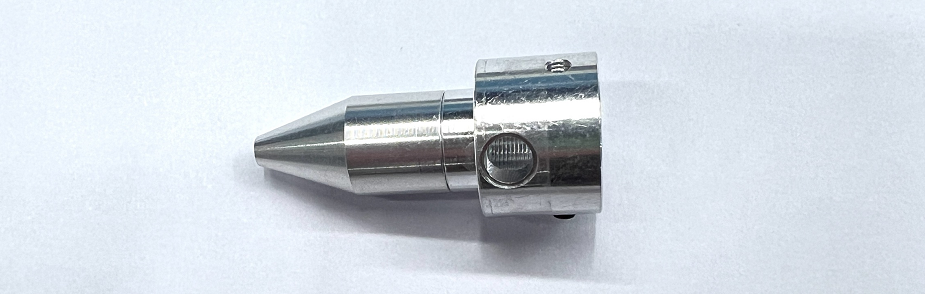
- If the problem persists after all checks, send a fault video and the laser serial code to customer service.
¶ 5. How to Solve Light or Faint Engraving Patterns
Solutions:
-
Check for normal power attenuation: Laser power may decrease over time. Increase power or reduce speed to compensate.
-
Check laser focus: Re-focus using the knob at the bottom; focus height should be 4mm from the laser's bottom frame to the material.
-
Check parameter and material settings: Ensure settings match the recommended parameters for the material, with the speed unit in mm/min. View the parameter table via the QR code on the machine, https://atomstack.com/pages/product-support, or by contacting customer service.
-
Check software maximum S-value: For LightBurn, ensure the max S-value is 1000 and has not been modified.
-
Check lenses for dirt or damage: Disconnect power, inspect the window and focus lenses, and clean if needed per the "Swift Laser Cleaning" section.
-
Check air guide installation: Ensure the air guide does not block the laser output.

-
Check adapter output: DC 24V, 1.5A (7W) or 24V, 2A (12W).
- Check laser connector voltage: Unplug the laser cable, run a cutting job at 100% power and 1mm/min. Pins 1-2 should be ≥20V, Pins 2-3 should be ≥1V. Lower voltage indicates a motherboard fault — provide a fault video, voltage measurement video, and Serial Number photo to customer service. Refer to the laser connector voltage test video, Swift motherboard replacement video, and Swift motherboard cable replacement video.
- Abnormal power degradation: If all checks are normal but output is still weak, the laser power may be abnormally degraded. Provide a cutting video showing parameters, process, results, and the laser's serial code. Refer to the Swift Laser Replacement Video.
¶ Mechanical & Motion Issues
¶ 6. How to Solve Vector Line Shaking During Engraving
Solutions:
- Check that X and Y frame screws are tight.
- Ensure the vector speed is ≤ 1000mm/min — excessive speed can cause abnormal shaking.
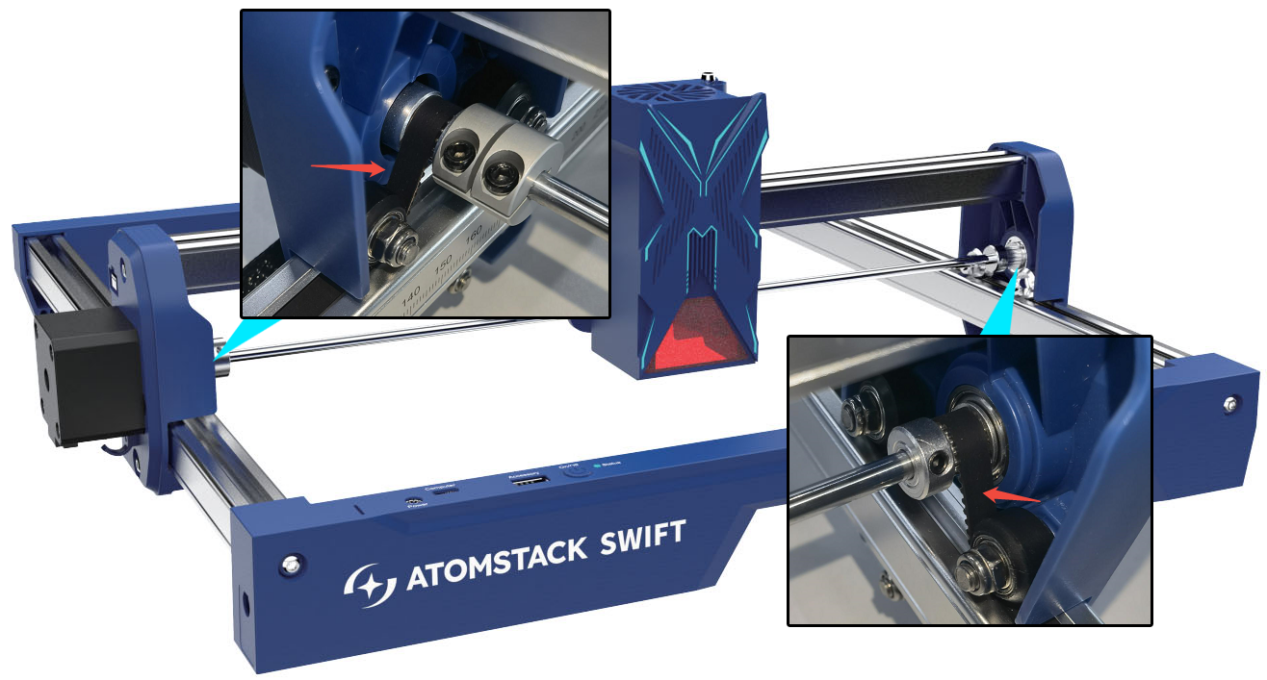
- Inspect POM wheels on the X and Y axes for damage: If deformed, send clear photos plus a Serial Number photo to customer service. Refer to the Swift POM Wheel Replacement Video.

Click to play video on YouTube
- Check eccentric nuts for proper tension: Gently shake the ends of the X-axis or the X-axis laser module — if there is play, the eccentric nuts may need adjusting. The correct standard is no play, while the axis or laser should still slide freely to the bottom when the machine is tilted 45°. Adjust per the Swift Structure Adjustment Video.

Click to play video on YouTube
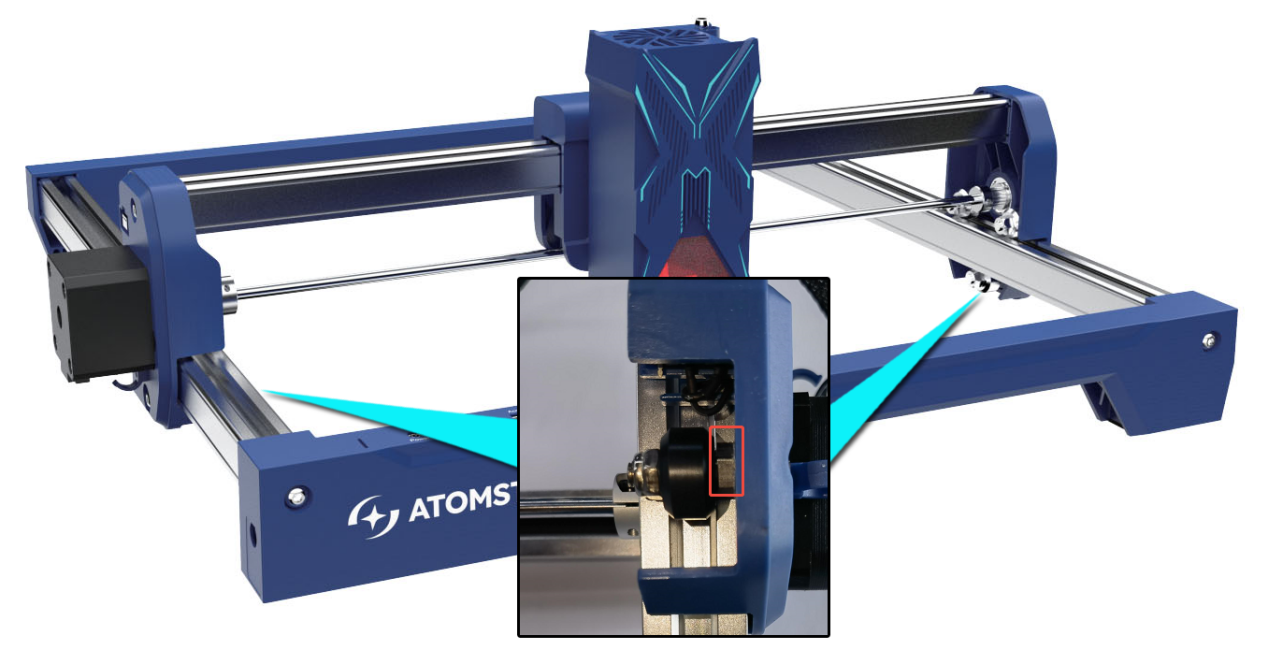
- Check timing belt tension: Press down on the belt between the POM wheel and the pulley — if too loose, adjust per the Swift Timing Belt Replacement Video.

Click to play video on YouTube
- Check motor pulley screws: Using an L1.5 hex wrench, ensure the pulley screws at both motors are tight; tighten if loose, keeping equal distance between the X-axis ends and the horizontal beams.
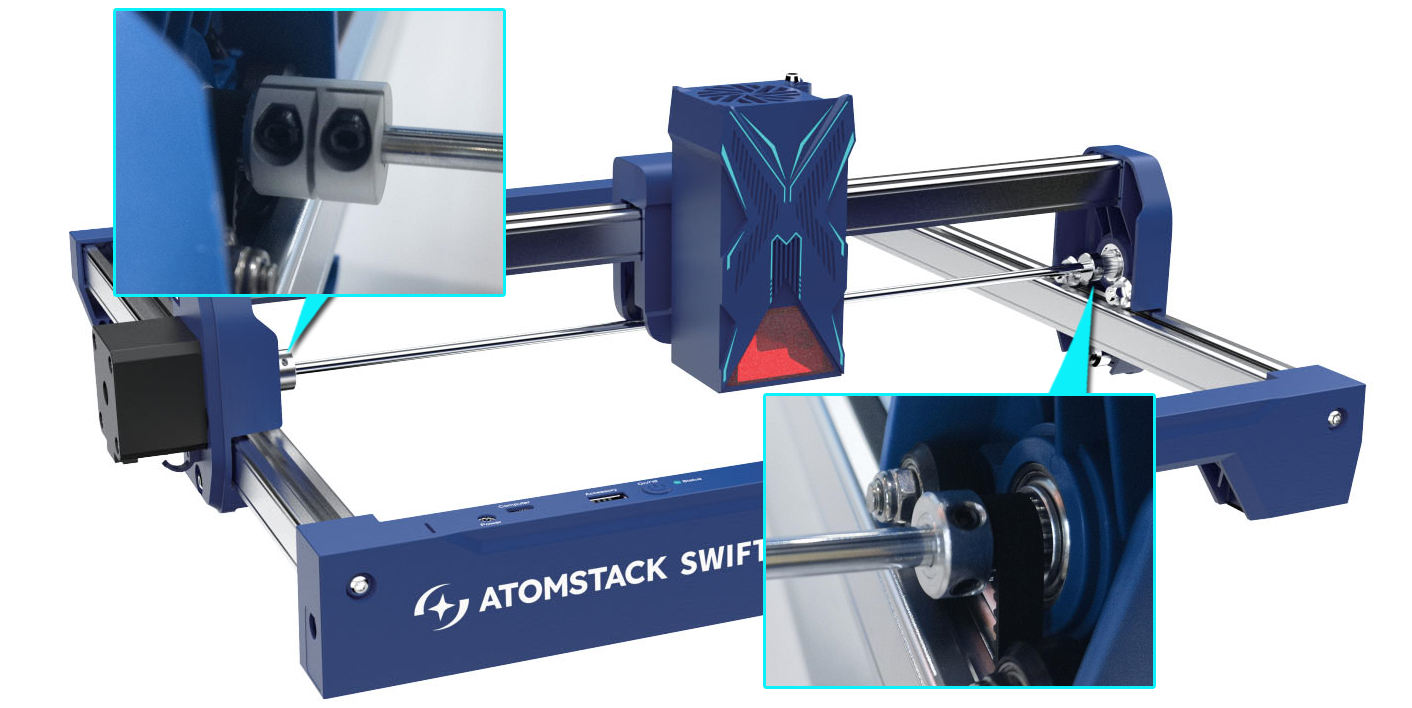
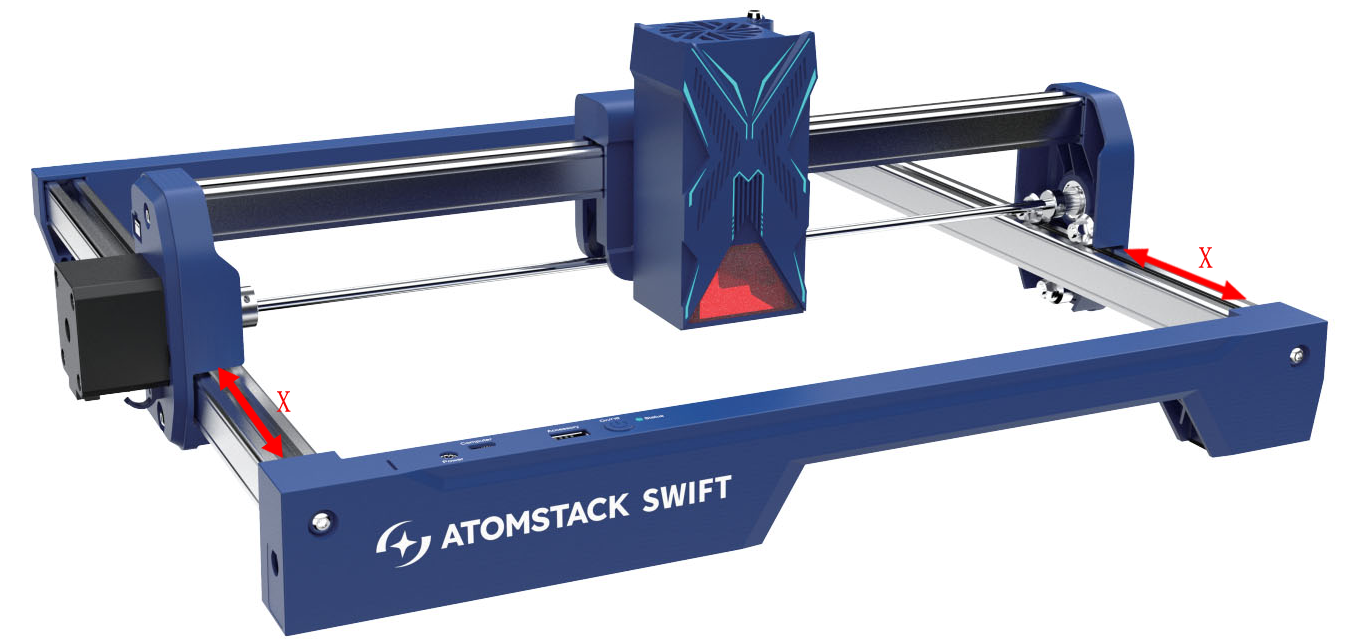
- Check that the X-axis is level with the horizontal beams: Measure the distance between both ends of the X-axis and the beams — if unequal, adjust per the Swift X-Axis Leveling Video.

Click to play video on YouTube
- If none of the above resolves the issue, send a troubleshooting video (showing the software settings, engraving status, and results), the steps already checked, and a Serial Number photo to customer service.
¶ 7. How to Solve Pattern Deformation or Open Lines
Solutions:
- Check that X and Y frame screws are tight.
- Inspect POM wheels for damage: If deformed, send clear photos and a Serial Number photo to customer service. Refer to the Swift POM Wheel Replacement Video.
- Check eccentric nuts: Gently shake the ends of the X-axis or the X-axis laser module — adjust so there is no play, while the axis or laser can still slide freely to the bottom at a 45° tilt. Refer to the Swift Structure Adjustment Video.
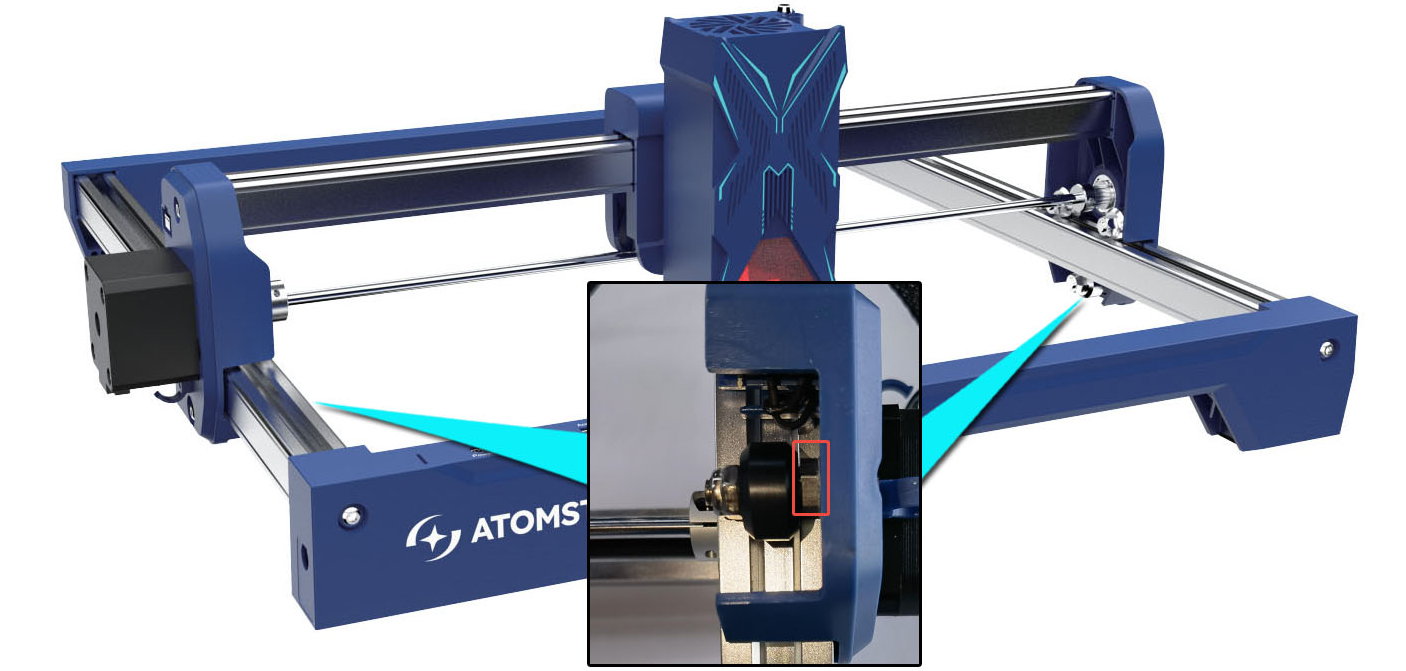
- Verify step length: Via LightBurn, check that motor steps $100 and $101 equal 100.15; correct if needed. After changing, click "Write" and then OK.
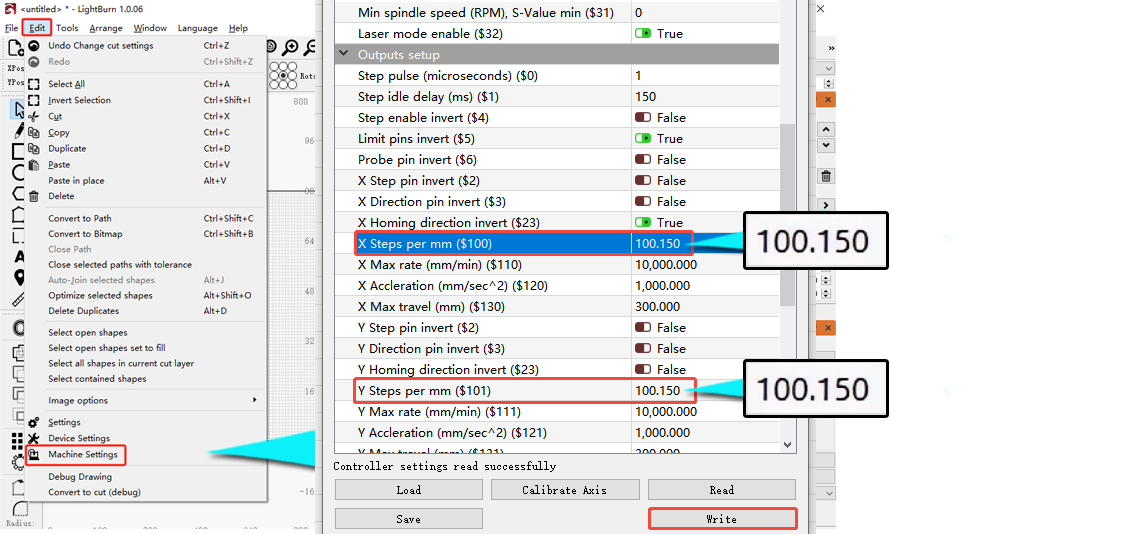
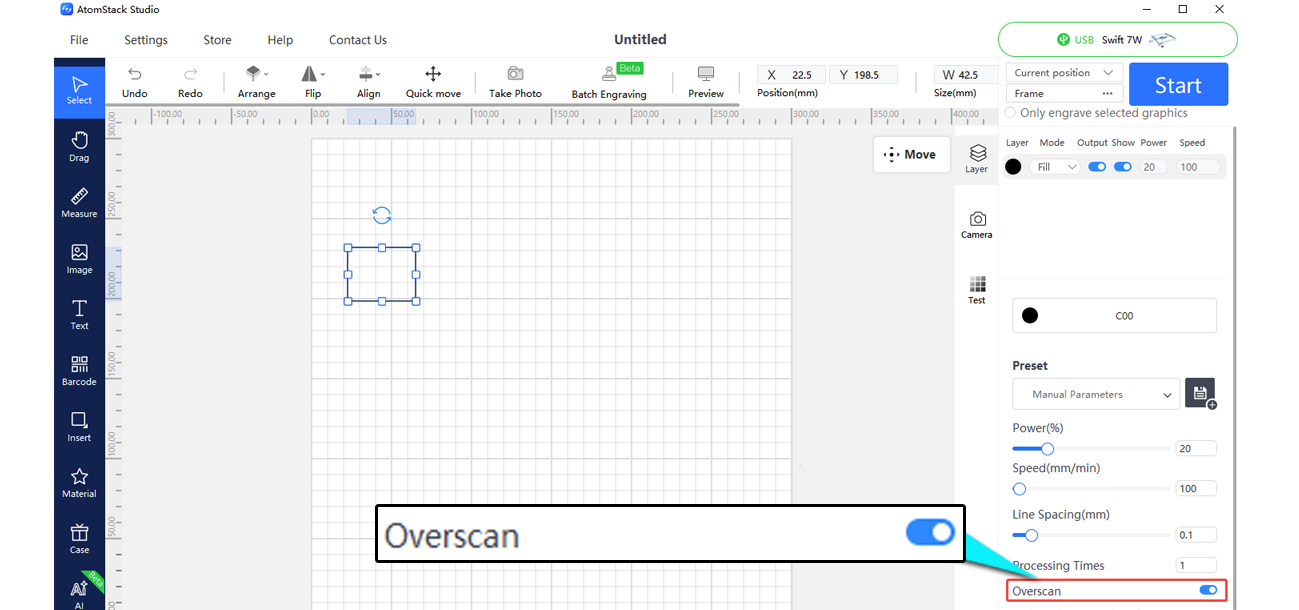
- Enable "Overscan" in the software (LightBurn or AtomStack Studio).
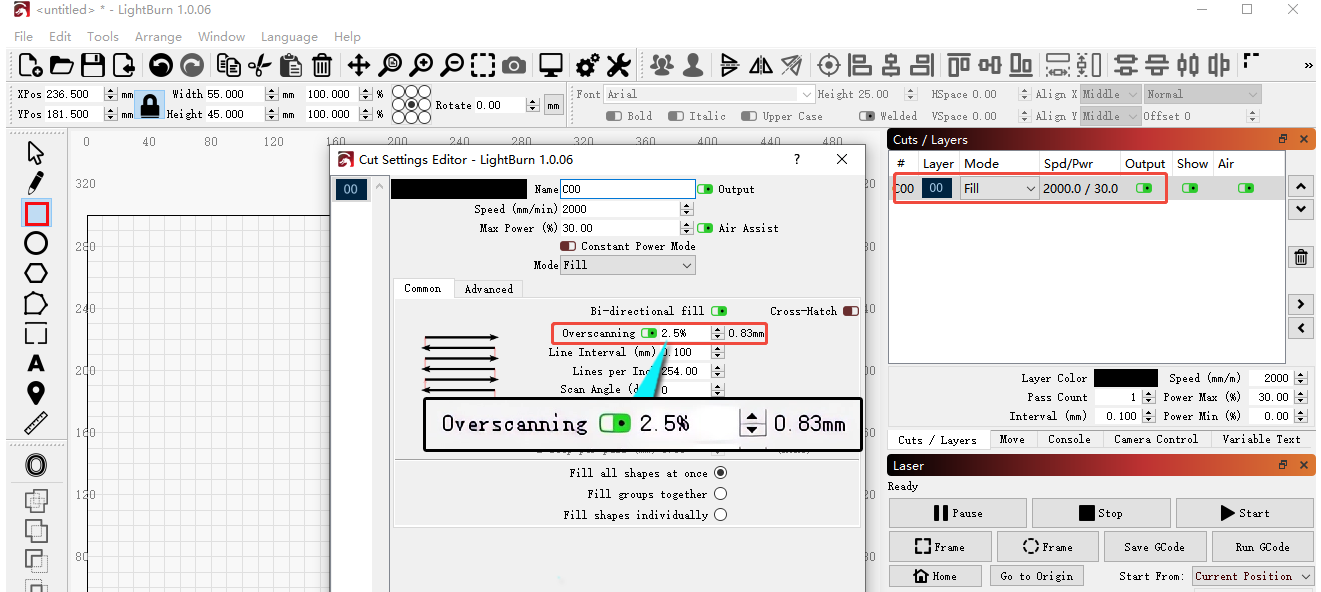
- Check motor pulley screws: Using an L1.5 hex wrench, ensure both motor pulley screws are tight; tighten if loose, keeping equal distance between the X-axis ends and the beams.
- Ensure X-axis and horizontal beams are level: Measure the distance on both ends; adjust per the Swift X-Axis Leveling Video if unequal.
- Check timing belt tension: Press down on the belt between the POM wheel and the pulley; adjust per the Swift Timing Belt Replacement Video if too loose.
- Test motor movement: Click the directional movement buttons in the software (AtomStack Studio, LightBurn) and check that the machine moves correctly.
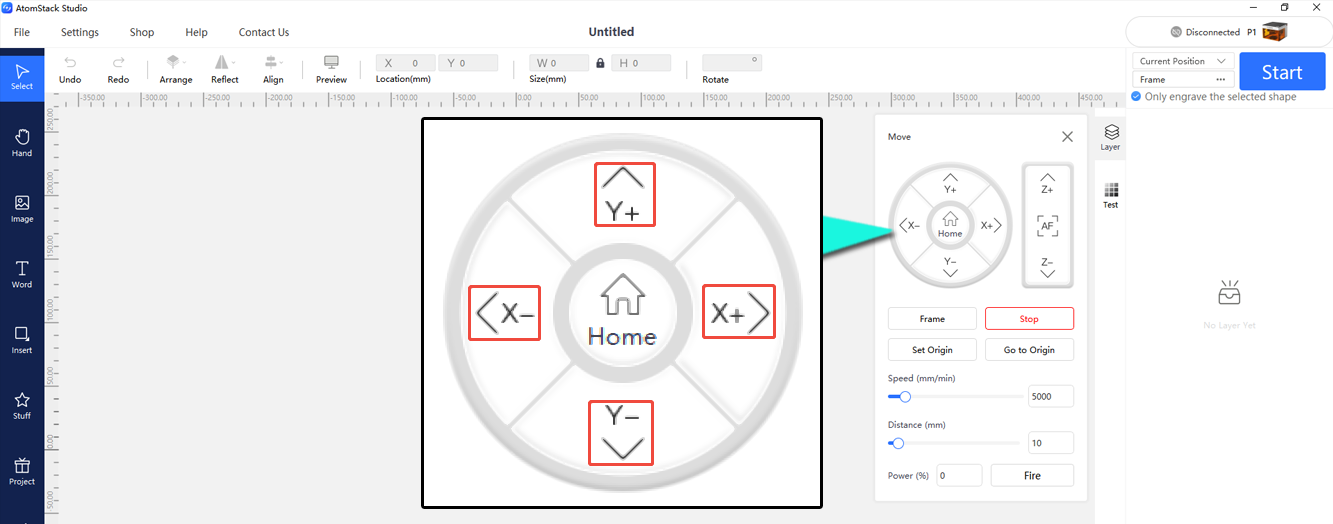
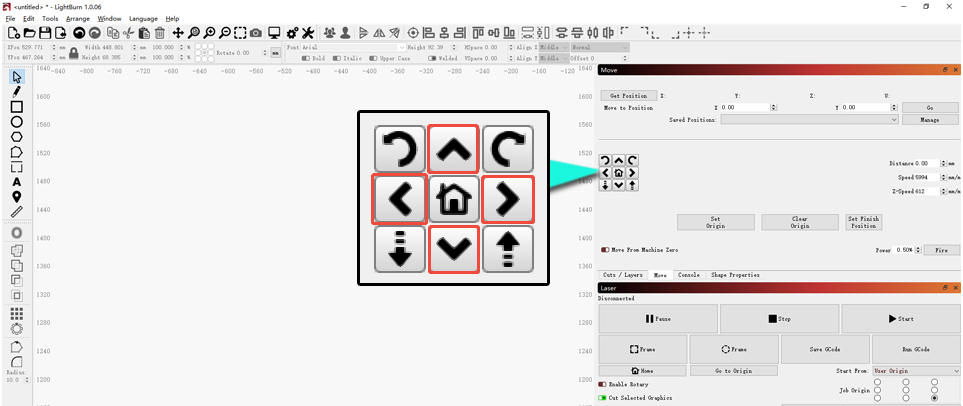
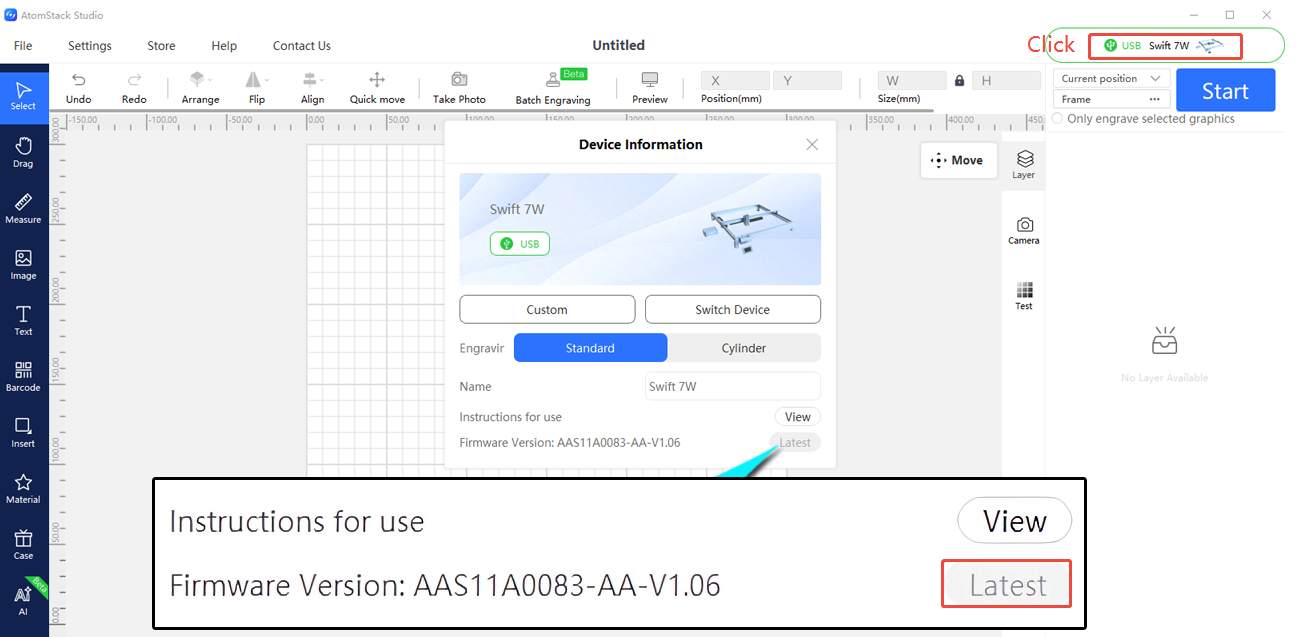
- If movement is normal, the firmware may be abnormal — update it via AtomStack Studio or the APP, or provide a Serial Number photo to request matching firmware for a TF card update. Refer to the Swift Firmware Upgrade Video.

Click to play video on YouTube
- If one axis does not move or vibrates, check the motor connectors (including those on the motherboard) — unplug and reconnect. If the problem persists, swap the connector of the working axis with the non-working one to see if the fault transfers: if it transfers, it's a motherboard/cable fault; if not, it's a motor fault. Provide a video of the issue, the swap test, and a Serial Number photo to customer service. Refer to the Swift motor connector swap video, Swift motherboard replacement video, Swift motor replacement video, and Swift motherboard cable replacement video.

Click to play video on YouTube

Click to play video on YouTube
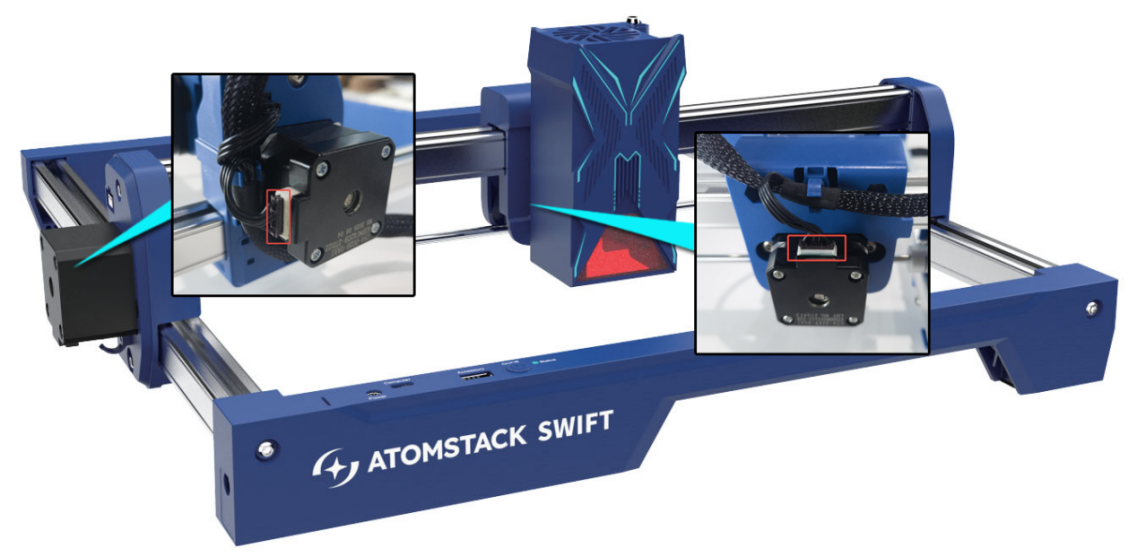
- If unresolved, provide a troubleshooting video with settings, engraving status, results, and a Serial Number photo to customer service.
¶ 8. How to Solve Swift Reset (Homing) Failure
Solutions:
- Check if motherboard cables are obstructing movement: Ensure all cables are routed through the cable holders and are not pulled during movement.
- If reset causes a collision with the frame: Usually due to a limit switch malfunction. Press the X and Y limit switches manually — a "click" sound should be heard and the software should show an alarm.
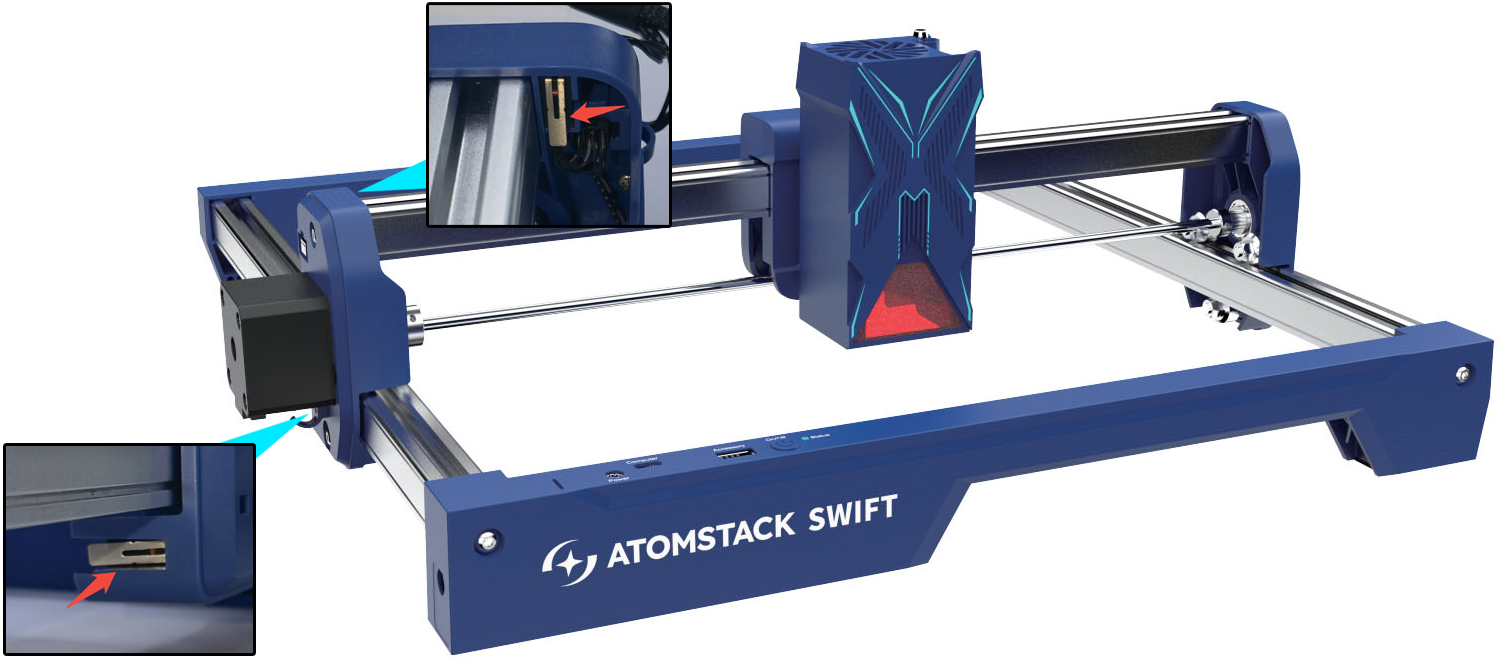
- If no click/alarm occurs, check the limit switch connector — unplug and reconnect. If still not working, record a video of the issue and provide the machine's Serial Number to customer service. Refer to the Swift Limit Switch Replacement Video.

Click to play video on YouTube
- If the click/alarm occurs but collisions persist, and pressing the limit switch mid-homing does not stop it, the firmware may be abnormal — update it via AtomStack Studio or the APP, or provide a Serial Number photo to request matching firmware for a TF card update. Refer to the Swift Firmware Upgrade Video.
- If an alarm shows without any movement: Test movement via the directional buttons in AtomStack Studio or LightBurn.
- If movement is normal, the firmware may be abnormal — update via AtomStack Studio or the APP, or request matching firmware via Serial Number. Refer to the Swift Firmware Upgrade Video.
- If one axis fails to move or vibrates, check the motor connectors, unplug/replug, and if the issue persists, swap connectors between the working and non-working axis to determine if it's a motherboard/cable fault or a motor fault. Provide the fault video, swap test video, and Serial Number photo to customer service. Refer to the Swift motor connector swap video, Swift motherboard replacement video, Swift motor replacement video, and Swift motherboard cable replacement video.
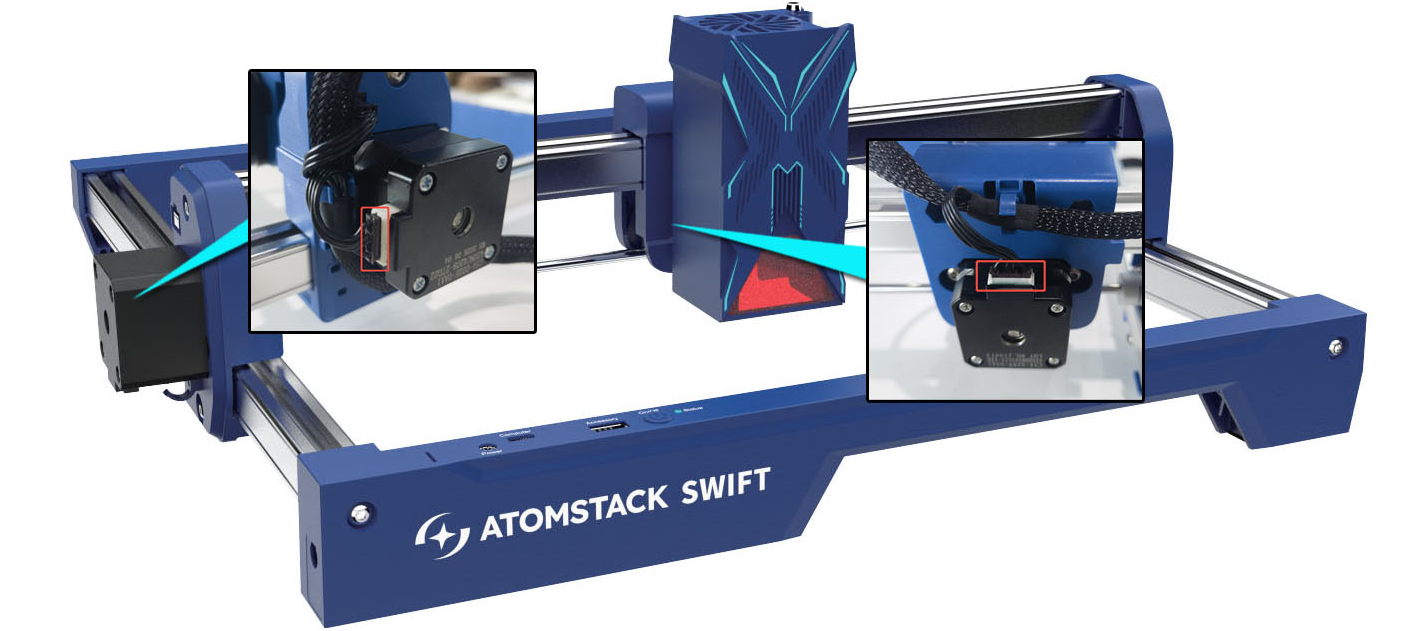
-
If both axes fail to move, try updating the firmware via AtomStack Studio or the APP, or request matching firmware via Serial Number. If it's still unresolved, it may be a motherboard or cable fault — provide the fault video and troubleshooting steps to customer service. Refer to the Swift motherboard replacement video and Swift motherboard cable replacement video.
-
Try a factory reset:
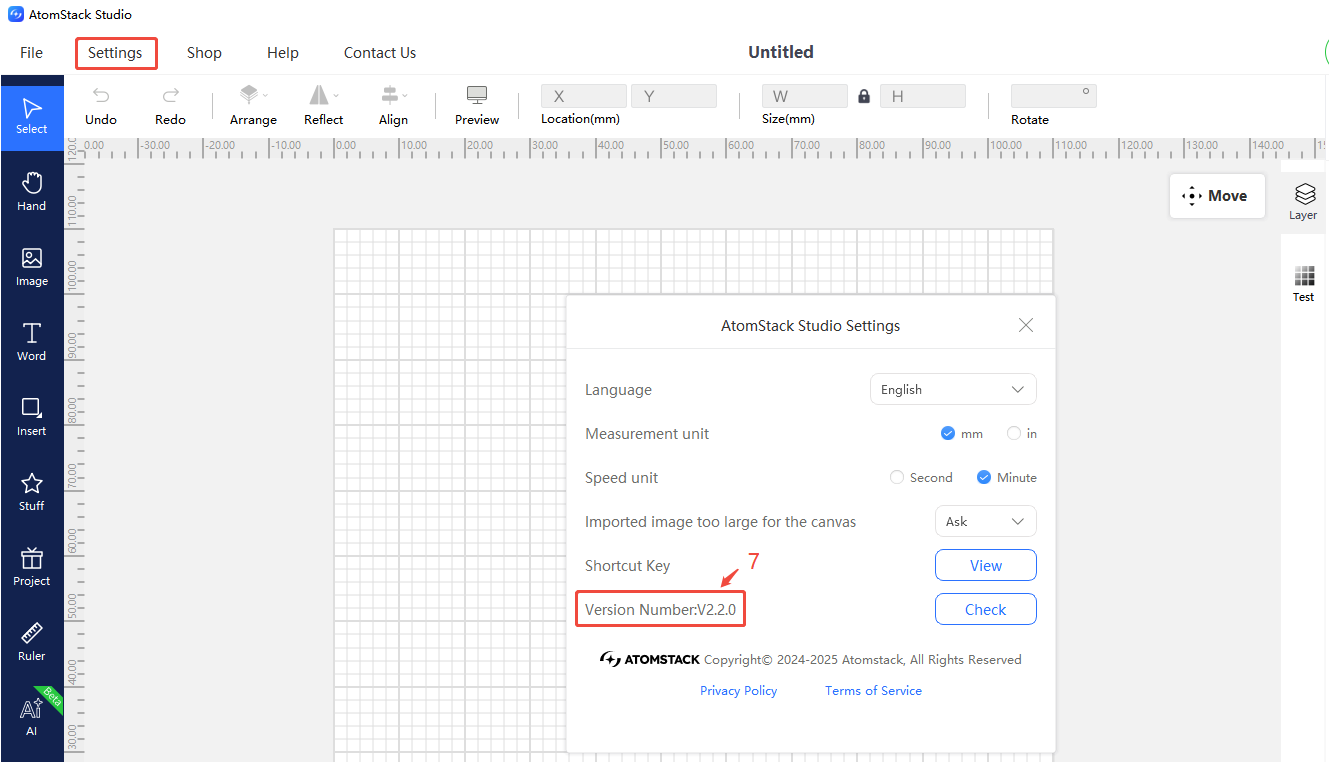
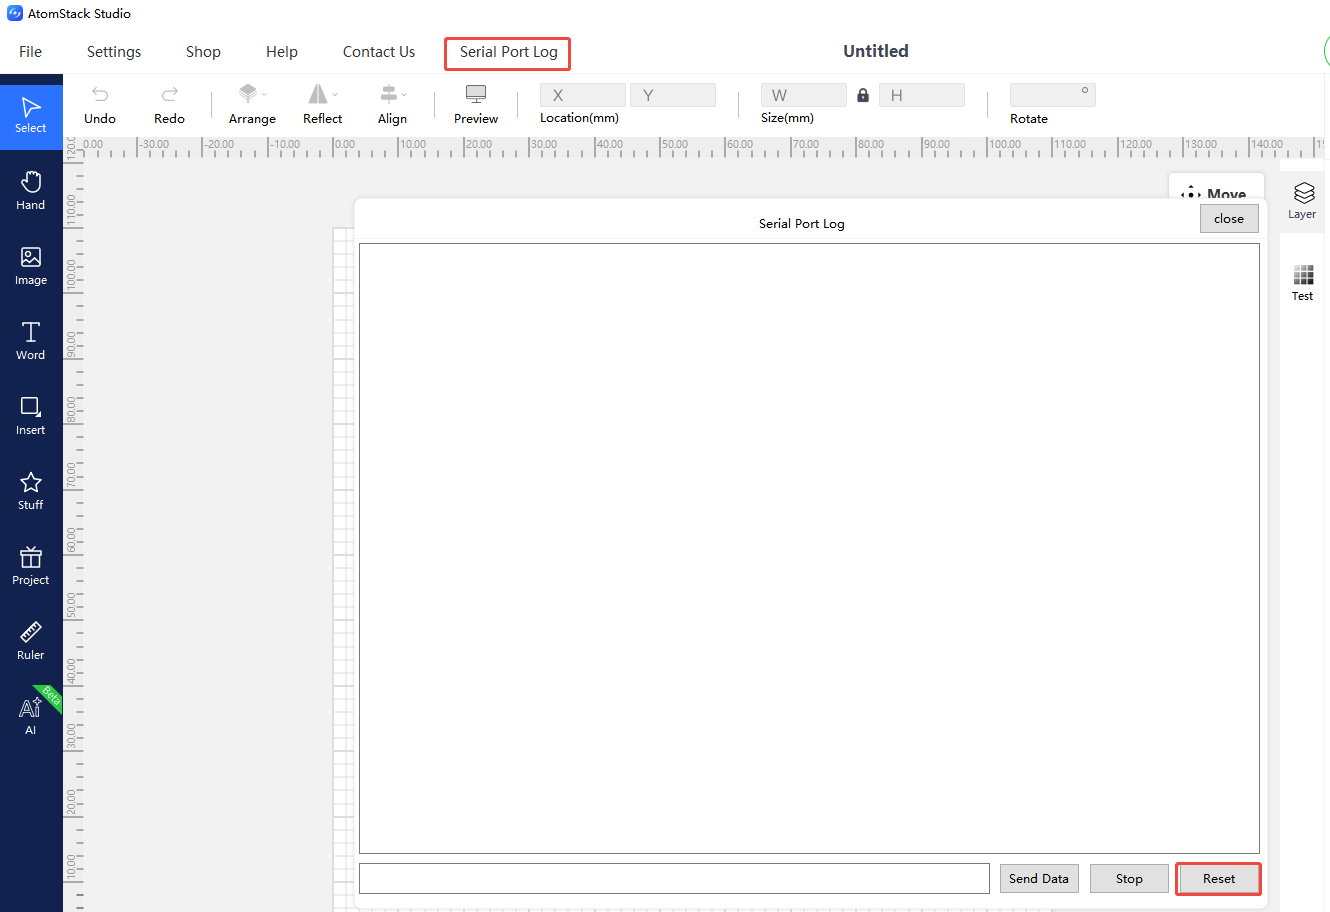
- Via AtomStack Studio (version ≥ 2.20): click the Version Number 7 times to enter Developer Mode, then open "Serial Port Log" in the menu and click "Reset".
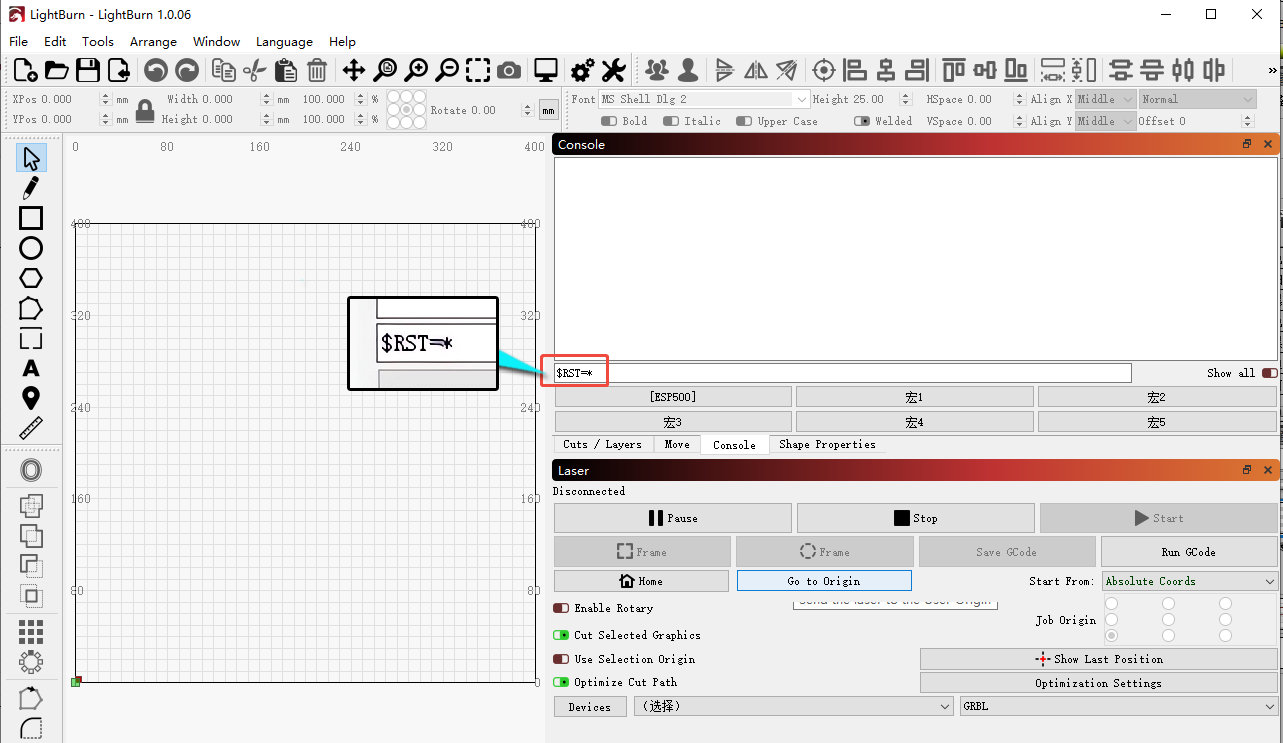
- Via LightBurn: enter
$RST=*in the console.
¶ 9. How to Solve Swift Stuttering During Engraving
Solutions:
- Check the TF card: Remove it and test again — if normal afterward, the TF card may be damaged.
- Try different software: Switch to AtomStack Studio or LightBurn.
- Test motor movement: Click the directional buttons in the software.
- If movement is normal, skip to the next check.
- If one axis fails or vibrates, check the motor connectors (including on the motherboard), unplug/replug, and if unresolved, swap connectors between the working and non-working axis to identify a motherboard/cable vs. motor fault. Send the fault video, swap test video, and Serial Number photo to customer service. Refer to the Swift motor connector swap video, Swift motherboard replacement video, Swift motor replacement video, and Swift motherboard cable replacement video.
- Factory reset:
- Via AtomStack Studio (version ≥ 2.20): click the Version Number 7 times to enter Developer Mode, open "Serial Port Log", and click "Reset".
- Via LightBurn: enter
$RST=*in the console.
- Firmware upgrade: If factory reset does not resolve the issue, upgrade the firmware via AtomStack Studio or the APP, or provide a Serial Number photo to request the matching firmware for a TF card update. Refer to the Swift Firmware Upgrade Video.
- If all checks pass but the problem persists, it may be a motherboard fault — send a troubleshooting video, steps checked, and Serial Number photo to customer service. Refer to the Swift motherboard replacement video and Swift motherboard cable replacement video.
¶ 10. Swift Engraving Dimension Error
Solutions:
- Check steps: In LightBurn, go to machine settings and check motor steps $100 and $101 — they should read 100.15. Correct if needed.
- Check motor pulley screws: Using an L1.5 hex wrench, ensure both motor pulleys are tight; when tightening, keep equal distance between the X-axis ends and horizontal beams.
- Structural adjustment: Follow the Swift Structure Adjustment Video, focusing on the timing belts and pulleys.
- Factory reset:
- Via AtomStack Studio (version ≥ 2.20): click the Version Number 7 times → Developer Mode → "Serial Port Log" → Reset.
- Via LightBurn console: input
$RST=*.
- Firmware update: Upgrade via AtomStack Studio or the APP, or provide the Serial Number to request the matching firmware via TF card. Refer to the Swift Firmware Upgrade Video.
- If unresolved, it's likely a motherboard fault — provide a troubleshooting video and Serial Number photo to customer service. Refer to the Swift motherboard replacement video and Swift motherboard cable replacement video.
¶ 11. Swift X or Y Axis Cannot Move or Makes Noise
Solutions:
Test movement via the directional buttons in the software (AtomStack Studio, LightBurn):
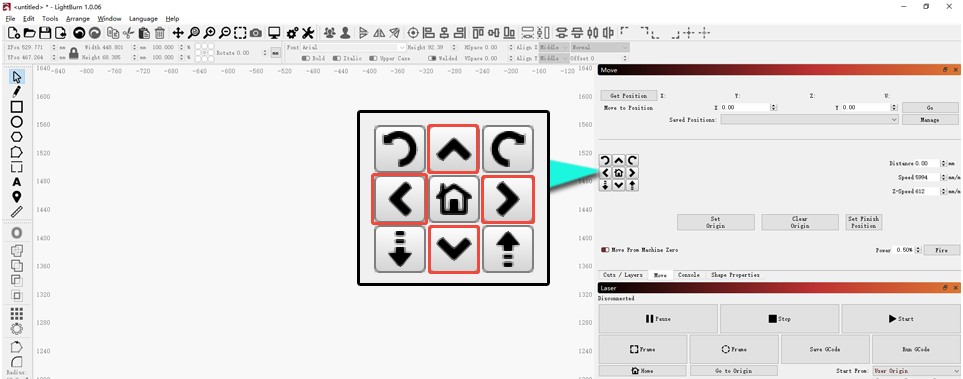
If one axis fails to move or vibrates, check the motor connectors (including on the motherboard) — unplug and reconnect. If the issue persists, swap the connector of the working axis with the non-working/noisy one to see if the fault transfers: transfer indicates a motherboard/cable fault, no transfer indicates a motor fault. Provide the fault video, swap test video, and Serial Number photo to customer service. Refer to the Swift motor connector swap video, Swift motherboard replacement video, Swift motor replacement video, and Swift motherboard cable replacement video.
¶ 12. Swift Engraving Appears Rough
Solutions:
- Check POM wheels: Inspect all 9 wheels on the frame for deformation or damage; if faulty, provide clear photos plus a Serial Number photo to customer service.
- Check X-axis end screws: Check the support bracket screws at both ends of the X-axis; tighten if loose.
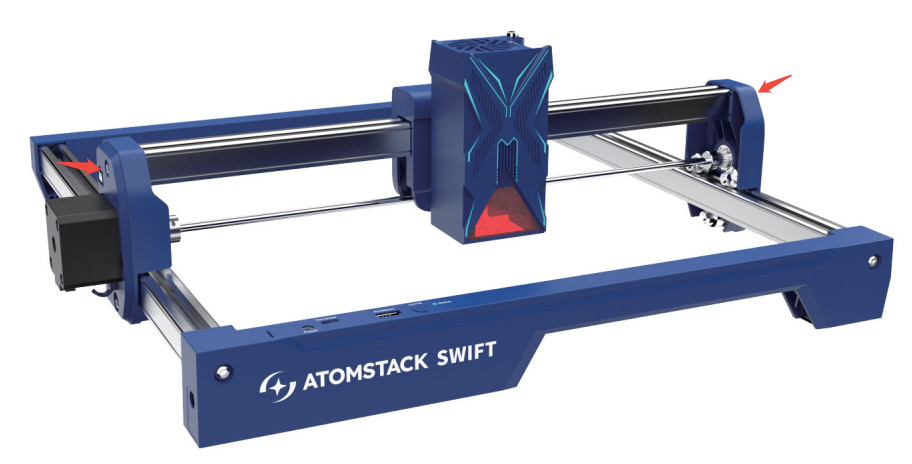
- Check X-axis bracket for play: Gently shake both ends of the X-axis and the laser bracket — if there is play, adjust the X-axis horizontal alignment and the eccentric nuts at the POM wheels per the Swift Structure Adjustment Video and Swift X-Axis Leveling Video.
- Check timing belt tension: Press down on the belt near the POM wheels — if too loose, adjust per the Swift Timing Belt Replacement Video.
¶ 13. Swift Collides with Frame During Edge Detection or Engraving
Solutions:
- Check file size: The Swift's engraving area is 300mm × 300mm — a file exceeding this range will inevitably cause a collision.
- Confirm coordinate selection: If using the current position, ensure the remaining space from the laser's current location is large enough for the file; alternatively, manually move the laser into range or use absolute coordinates.
- Check motor steps: After connecting via LightBurn or LaserGRBL, open "Edit — Machine Settings", double-click "Outputs Setup", and check whether $100 and $101 equal 100.150; correct if not.
- Try a factory reset:
- Via AtomStack Studio (version ≥ 2.20): click the Version Number 7 times → Developer Mode → "Serial Port Log" → Reset.
- Via LightBurn console: input
$RST=*.
¶ Connection, Power & System Issues
¶ 14. What to Do if the Swift Suddenly Stops During Engraving
Solutions:
- Ensure mains power is stable with no significant voltage fluctuations.
- Avoid touching the adapter or Type-C cable: Touching the adapter jack or Type-C cable during operation may cause a bad connection and stop the machine.
- Try different software: AtomStack Studio, the APP, or LightBurn. If the issue only occurs with computer software and not the APP, try a different USB port or Type-C cable.
- If the issue persists, check and update the firmware via AtomStack Studio or the APP.
- If a firmware upgrade does not resolve it, provide the troubleshooting steps and a Serial Number photo to customer service.
¶ 15. How to Solve Swift Won't Power On
Solutions:
- Check adapter output: Use a multimeter (DC mode) to confirm the adapter outputs 24V, 1.5A (7W) or 24V, 2A (12W).
- Check for short circuits: Unplug all motherboard connectors (limit switches, motors, laser), then try powering on.
- If power-on succeeds, a short exists in one of the components — plug the connectors back in one at a time to identify the culprit, then send a troubleshooting video and Serial Number photo to customer service.
- If it still fails, it's likely a motherboard fault — send a troubleshooting video and Serial Number photo to customer service. Refer to the Swift motherboard replacement video and Swift motherboard cable replacement video.
¶ 16. How to Solve Swift Power On with Red Light Alarm
Solutions:
- Check connectivity: Try connecting via AtomStack Studio or LightBurn.
- If it cannot connect, this may indicate a motherboard fault — send a fault video and Serial Number photo to customer service. Refer to the Swift motherboard replacement video and Swift motherboard cable replacement video.
- If it connects but cannot be controlled, this may be an alarm state caused by limit switches — check whether either of the machine's two limit switches is stuck or damaged by unplugging its connector to test. If confirmed faulty, send a fault video and Serial Number photo to customer service. If not the limit switches, use LightBurn or LaserGRBL, enter
$iin the Console input box, and send it — review the returned error codes, or share a screenshot of them with customer service.
¶ 17. How to Solve Swift Cannot Connect to Computer
Solutions:
- Ensure the machine powers on normally: After switching on, check if the indicator light turns white. If not, follow the "Swift Won't Power On" or "Swift Power On with Red Light Alarm" sections.
- Verify the connection cable: Check the port used, per the "Swift Panel Introduction" section.
- Restart the software and try reconnecting.
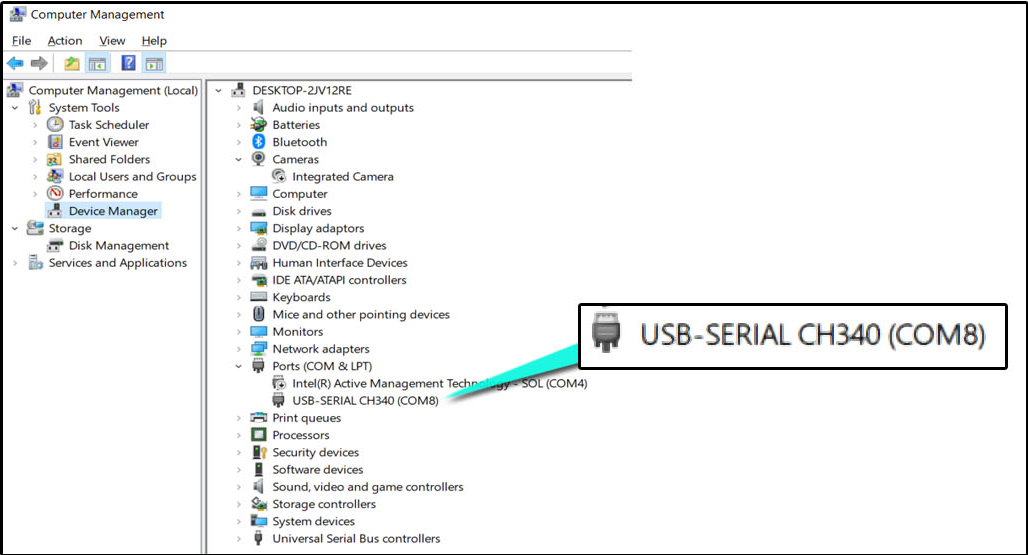
- Check if the computer recognizes the COM port: Open Device Manager and see if the machine's serial port appears (plug/unplug the Type-C cable to see it appear or disappear). If not recognized, or shown with a warning icon, install the driver:
- Windows driver download: https://asa.atomstack.com/downloadWindowsDrivers.do3
- Mac driver download: https://asa.atomstack.com/downloadMacDrivers.do3
-
Ensure no other software is occupying the port: Close any other software connected to the machine's serial port.
-
Check the operating system: On Windows, connect directly via Type-C. On Mac, use a hub and connect via the Type-C A port.

-
Try different software: AtomStack Studio or LightBurn.
-
Check the cable: Try a different data-capable Type-C cable — if that works, the original cable was faulty. Provide a fault video and Serial Number photo to customer service.
- Try another computer: If the issue persists on another computer, it's likely a motherboard fault — provide the troubleshooting steps, a fault video, and a Serial Number photo to customer service. Refer to the Swift motherboard replacement video and Swift motherboard cable replacement video.
¶ 18. How to Solve Swift Cannot Connect to APP
Solutions:
- Follow the connection steps: Refer to the Swift APP connection video.
- Check the APP version: Download the latest version from https://atomstack.com/pages/software-guide or by searching "AtomStack" in the app store.
- Stay close to the machine: Do not connect from too far away — stay near the machine's mainboard.
- Ensure the WiFi is not in use: Check whether another phone is already connected to the machine's WiFi, and disconnect it if so.
- Check the password: The default password for AtomStack machines is 12345678.
- Check WiFi signal strength: If the signal remains weak even close to the machine, the motherboard's WiFi module may be faulty — provide a fault video and Serial Number photo to customer service.
- If none of the above resolves the connection issue, try another phone. If the issue persists, provide a fault video and Serial Number photo to customer service. Refer to the Swift motherboard replacement video and Swift motherboard cable replacement video.
¶ 19. Swift APP Connected but Cannot Engrave
Solutions:
- Ensure the TF card is inserted: A TF card is required as storage when engraving via phone.
- Verify software controls: Check directional movement and controls work normally. If not, delete the machine profile in the software and reconnect, using the latest software version.
- Check the generated G-code file: The file should not be too large — files over 100MB may fail to transfer. Try engraving a few simple characters to test.
- Check the TF card: Read it on a computer to confirm files store correctly; reformat to FAT32 if needed.
- Try another phone: If the issue persists, send a fault video and Serial Number photo to customer service. Refer to the Swift motherboard replacement video and Swift motherboard cable replacement video if a motherboard swap is needed.
¶ 20. Swift Using LaserGRBL Software Abnormal
Solution:
LaserGRBL is not recommended, because the machine's default baud rate is 460800. Using LaserGRBL to connect and operate the machine may cause stuttering and other abnormal behavior.
¶ 21. Swift Cannot Read TF Card
Solutions:
- Check that the TF card is inserted: Check the TF card slot on the bottom of the control box; remove and reinsert the card.
- Check TF card integrity: Remove the card and read it on a computer via a card reader to confirm files can be read and written normally.
- Try another TF card: Insert a different TF card into the machine.
- If none of the above resolves the issue, try replacing the motherboard — send a Serial Number photo and a fault video to customer service. Refer to the Swift motherboard replacement video and Swift motherboard cable replacement video.
¶ Accessories, Process & Other Issues
¶ 22. Swift Cutting Edges Turn Black or Yellow
Solutions:
-
Ensure air assist is enabled: Cutting requires air assist — if you haven't purchased one, get the AtomStack F40 Air Assist, which is the only one that comes with the required laser air nozzle. See the "Swift Air Assist Connection" section for details.
-
Check laser focus: Re-focus using the knob at the bottom of the laser; the correct focus height is 4mm from the laser's bottom frame to the material surface.
-
Use a honeycomb panel: Place a breathable honeycomb panel under the material when cutting — the dedicated AtomStack F2N (350mm × 350mm) is recommended if you don't already have one.
-
Check material thickness: Follow the recommended thickness and parameters — exceeding the recommended thickness may prevent a clean cut-through, causing black or yellow edges.
-
Check cutting parameters: Follow the recommended parameter table — power that's too high or speed that's too slow can burn the edges. View the parameter table via the QR code on the machine, https://atomstack.com/pages/product-support, or by contacting customer service.
-
Check the window and focus lens: Clean or repair the lenses (12W) if dirty or damaged, per the "Swift Laser Cleaning" section.
-
Check laser power: Test-cut per the parameter table — consider power decay if the laser has been used for a long time, and try increasing power or reducing speed. If it still cannot cut, or the cut lines are very rough, the laser may be faulty — provide a fault video and the laser's engraving code to customer service.
¶ 23. Swift Flame Detection Not Working
Solutions:
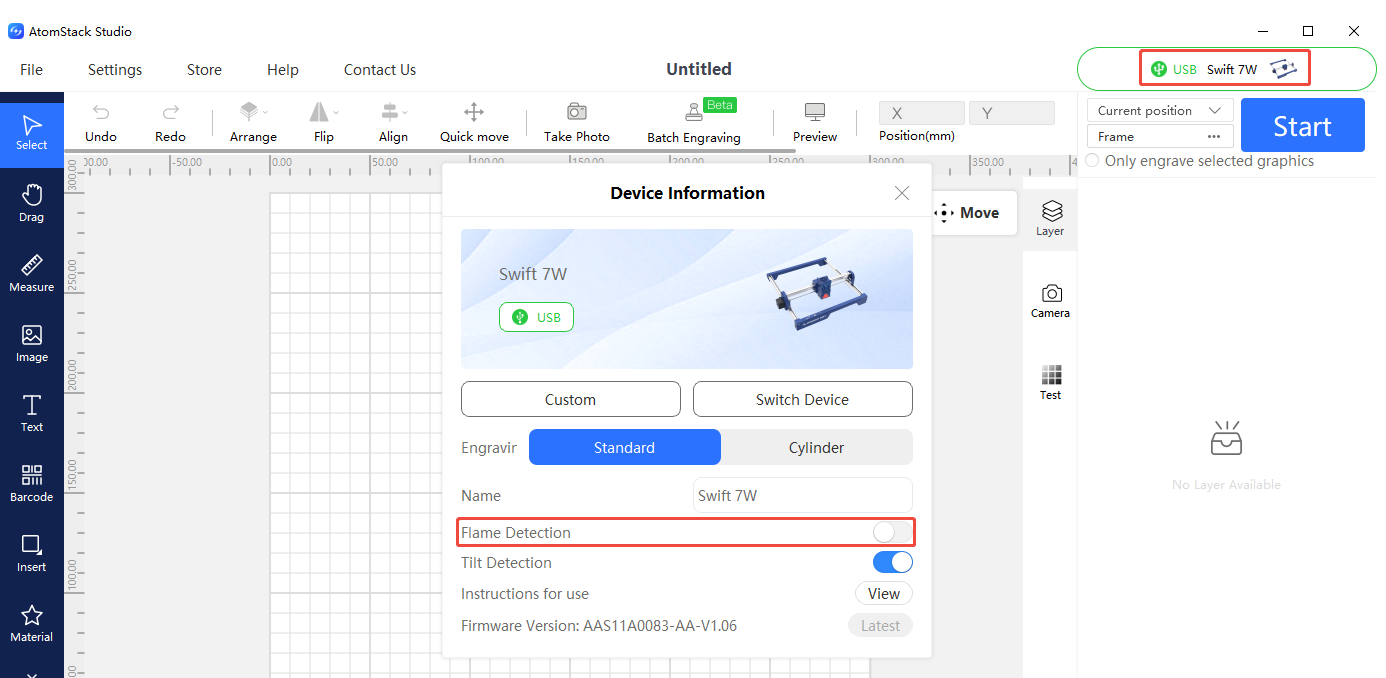
- Ensure flame detection is enabled: Check this setting in AtomStack Studio or the APP.
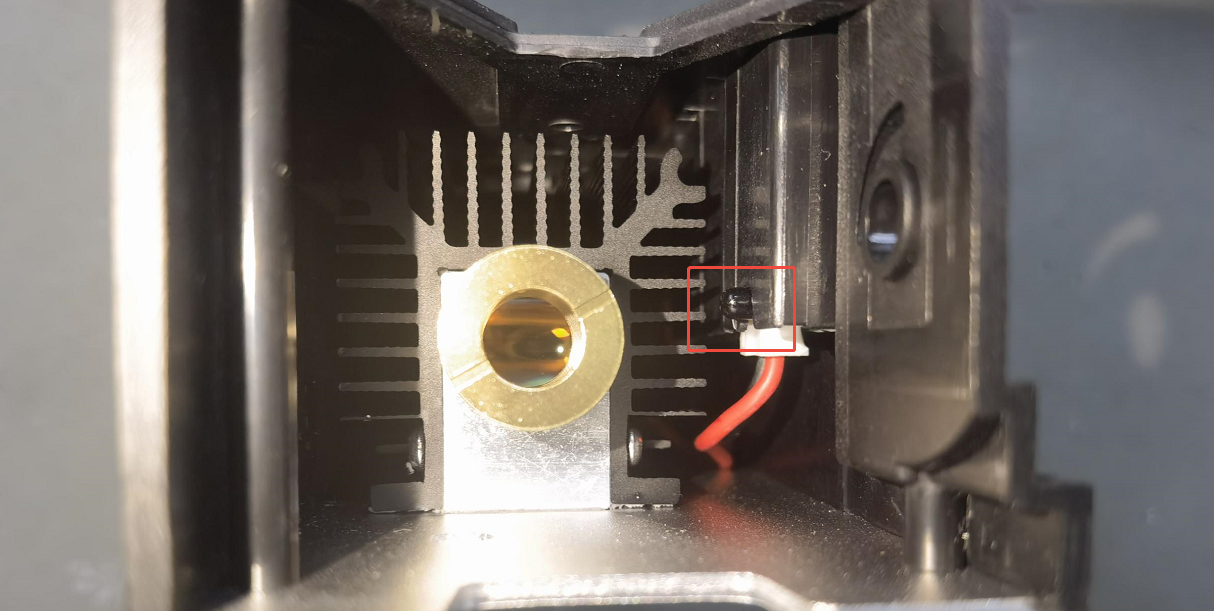
- Keep the sensor clean: After extended use, dust or smoke residue on the sensor can reduce sensitivity — wipe gently with a lint-free cloth dampened with anhydrous ethanol.
- If unresolved, the sensor may be damaged and the driver board may need replacement — provide the troubleshooting steps, a fault video, the laser's engraving code, and the machine's Serial Number photo to customer service.
¶ 24. Swift False Flame Alarm
Solutions:
- Check line density: Dense line patterns when cutting wood may trigger false alarms — try increasing speed or reducing power and cutting in two passes.
- Check the material: Cutting MDF may trigger false alarms — disable flame detection in the software if this happens frequently.
- If false alarms occur frequently on plywood too, adjust flame detection sensitivity via LightBurn or LaserGRBL:
$fire_alarm/overflow_value=15(adjusts the trigger count above the threshold) and$fire_alarm/threshold_value=74(the flame threshold — the higher the value, the harder it is to trigger).
Note:
- While these techniques are useful, they are not a substitute for careful operation. Always keep the machine under close supervision while it is running — safety should always be your top priority.
¶ 25. Swift Engraving Pattern Mirror Issue with Rotary
Solutions:
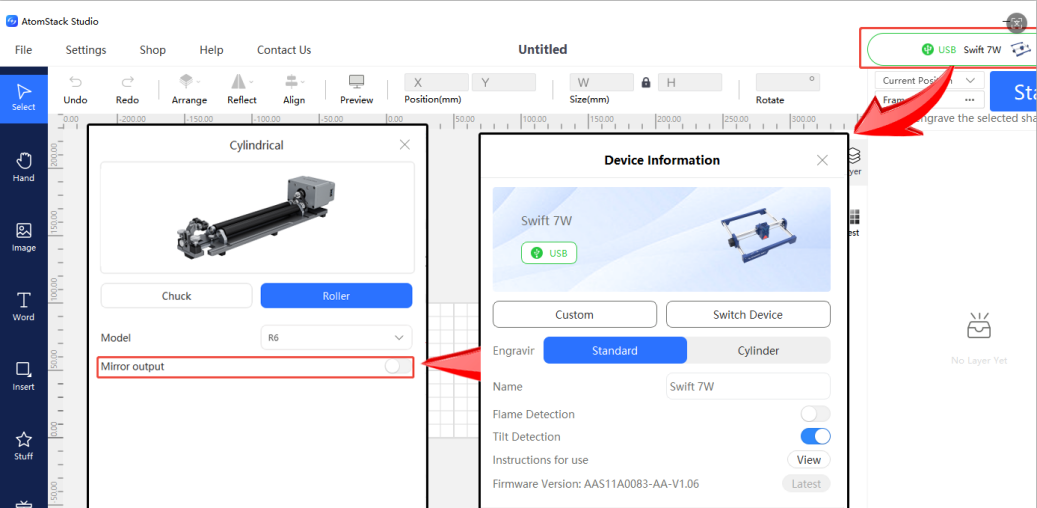
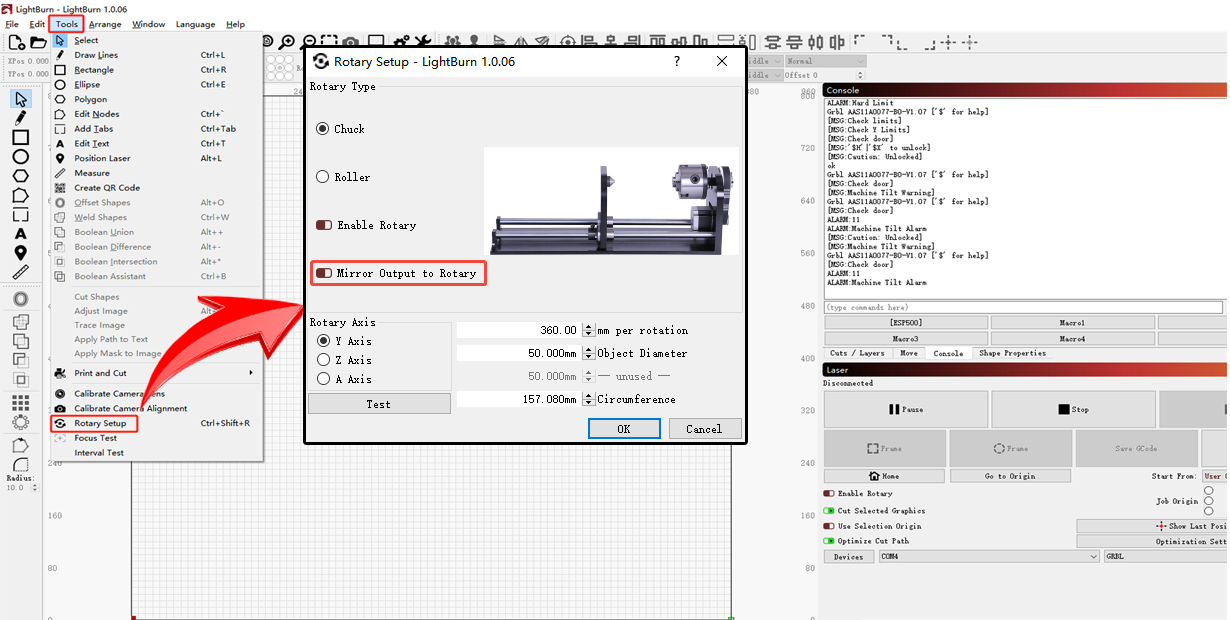
- Check if the pattern is mirrored: If so, check whether the mirror function is toggled on/off in the software, and switch it as needed (AtomStack Studio, LightBurn).
- If unresolved, perform a factory reset via
$RST=*in the LightBurn console, or reflash the firmware. Note that identical firmware cannot be reflashed twice — contact customer service to request it if needed.
¶ 26. Swift Rotary Connection Cannot Be Used
Solutions:
-
Confirm the connection: For auto-recognized rotary units (R6, R8, R8 PRO), use the supplied USB cable. For first-generation rotary units (R1, R1 Pro, R2, R3 PRO, R1-B, etc.), use the sequential connection cable to link the rotary unit to the Swift's Y-axis motor connector.


-
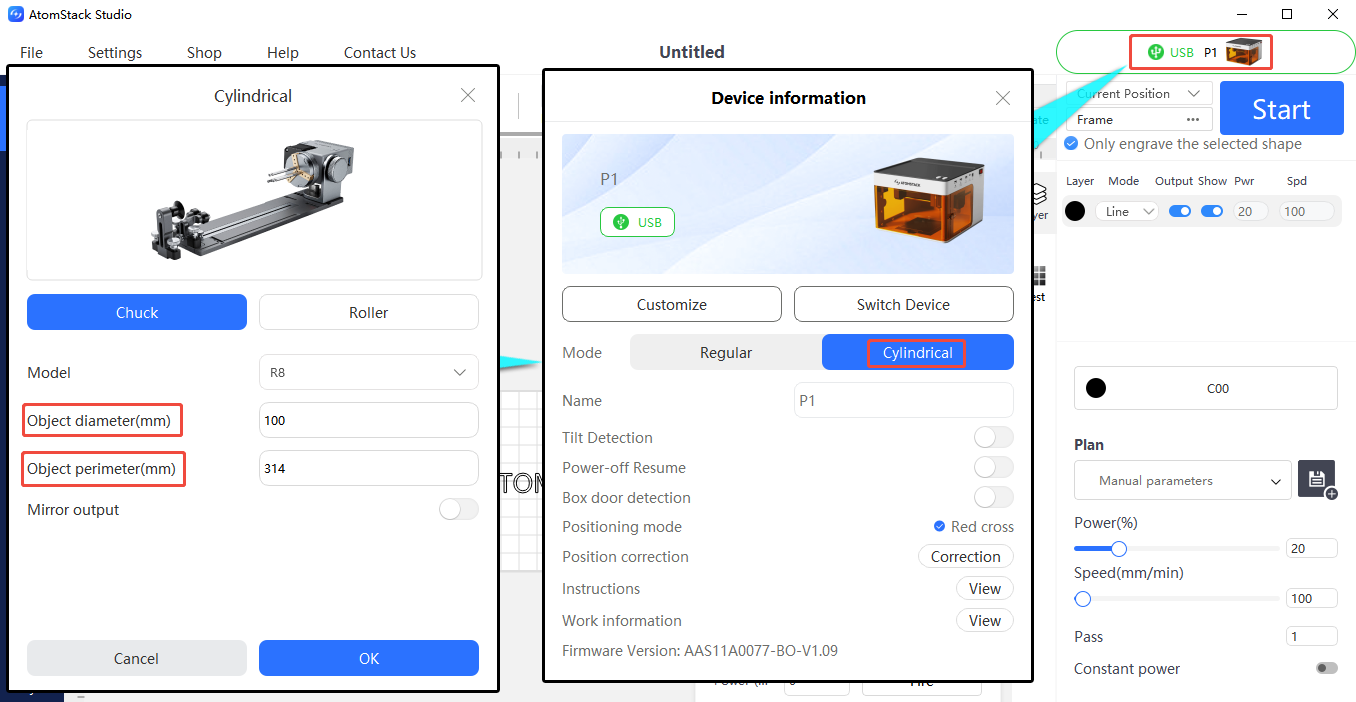
Confirm the settings:
- In AtomStack Studio: the roller (R6) requires no parameter changes; the chuck (R8) requires entering the material's circumference or diameter.
-
In LightBurn: set the rotary type (Roller for R6, Chuck for R8), select the Y-axis, and enter the parameters — R8: 160mm/rotation (fixed), enter diameter or circumference; R6: 50mm/rotation (fixed), roller diameter 16mm (fixed), enter diameter or circumference.

-
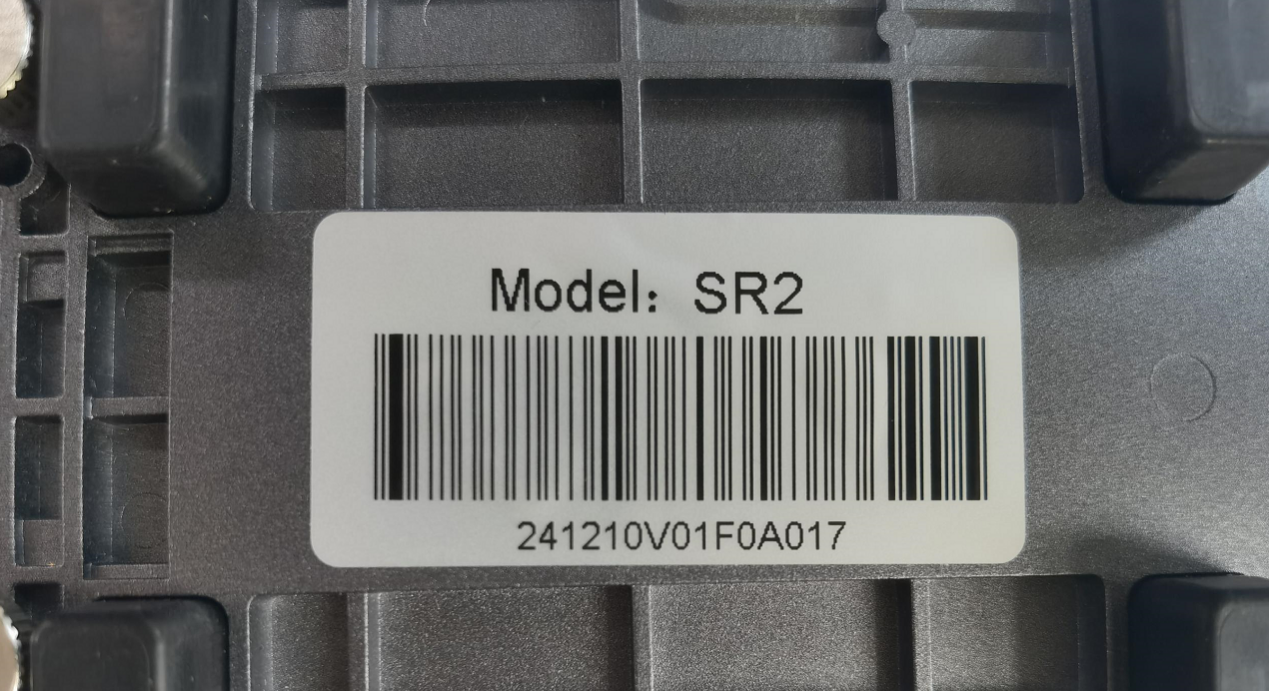
Check movement: After connecting, move along the Y-axis to observe whether rotation is normal. If it stutters or spins uncontrollably, the rotary motor may be faulty — test by plugging the Y-axis motor cable directly into the rotary motor. If the issue persists there, but the Y-axis cable works normally when reconnected to the Swift's own Y-axis motor, this confirms a rotary motor fault. Provide a fault video and a photo of the rotary unit's model label (on the underside) to customer service. Refer to the R6/R8 Motor Replacement Video and R1/R3 Motor Replacement Video.

Click to play video on YouTube
¶ 27. How to Replace Damaged Swift Plastic Parts
Solutions:
Provide photos of the damage and a Serial Number photo to customer service, who will guide the replacement. Refer to the Swift Plastic Parts Replacement Video.