¶ 1. None of the Indicator Lights Turn On After Switching On the Atelier Power.
Solution:
-
Check the adapter output voltage: use a multimeter to measure whether the power adapter's output voltage is 24V (see Figure 13).

Figure 13 -
Check the power switch wiring: if the power adapter is functioning normally, open the top cover of the Atelier and check whether the power switch wiring is properly connected (see Figure 14).

Figure 14 -
Check the power switch: if the switch wiring is properly connected, unplug the adapter and disconnect the power switch wiring. Use a wire to short the switch terminals, then plug the adapter back in to see if the machine powers on. If the machine turns on after shorting, the power switch is faulty. If the problem persists, it may be a mainboard issue. Please provide the device Serial Number (see Figure 15) and a troubleshooting video to customer support for assistance. References: Atelier Power Switch Shorting Video, Atelier Mainboard Replacement Video.

Click to play video on YouTube

Click to play video on YouTube

Figure 15
¶ 2. After Turning On the Atelier Power Switch, the Status Indicator Light Turns Red.
Solution:
-
Confirm that the USB key is inserted: check whether the USB Key is plugged into the USB Key port on the back of Atelier. If it is, gently touch it and check whether it makes a beep sound and the status indicator turns white. If normal operation is restored by touching it, gently adjust the USB Key so that it is pressed close to the inner wall of the port. If the above measures cannot resolve the poor contact issue, please provide the device Serial Number (as shown in Figure 16) and a fault video, and send them to customer service for further handling.
Figure 16 -
Confirm that the enclosure door is properly closed: open the enclosure door again and then close it, and check whether the status indicator returns to normal. You can also turn off the "Door Detection" function in AtomStack Studio (PC version or mobile version), as shown in Figure 17. If the indicator returns to normal after disabling this function, it indicates a failure of the door limit switch (Hall sensor). Please provide the device Serial Number and a fault video and send them to customer service for further handling. Please refer to the Atelier Hall sensor replacement video.

Click to play video on YouTube

Figure 17
-
Try reflashing the firmware: if there are no abnormalities with the USB key or the door limit switch, please provide the device Serial Number to customer service to request the latest Atelier firmware and try updating it to see if the issue can be resolved.
-
If the above steps still cannot resolve the issue, replace the mainboard: please provide the device Serial Number, fault video, and the troubleshooting steps you have performed to customer service. For replacement, please refer to the Atelier mainboard replacement video.
¶ 3. Atelier Cannot Connect to the Computer.
Solution:
-
Check the machine power status:
- After power-on, the status indicator lights up white — normal power-on state.
- After power-on, the status indicator lights up red — alarm state, troubleshoot according to the section "After Turning On the Atelier Power Switch, the Status Indicator Light Turns Red."
- After power-on, the status indicator does not light up — abnormal power-on state, troubleshoot according to the section "None of the Indicator Lights Turn On After Switching On the Atelier Power."
-
Confirm the baud rate setting: when using AtomStack Studio, there is no need to set the baud rate manually. When using LightBurn, you need to set the baud rate to 460800 (as shown in Figure 18), or directly import the configuration file in LightBurn. Please refer to the guide for importing the Atelier configuration file into LightBurn, and make sure to select the L1-GALVO controller. The use of LaserGRBL software is not recommended.

Figure 18 -
Confirm that the computer can recognize the serial port: go to the Device Manager on your computer and check whether the laser engraving machine's serial port (CH340) appears (you can plug and unplug the Type-C cable to see the serial port appear or disappear). If the serial port is not recognized, or if it appears with a warning sign, you can first install the driver. The serial port should display as shown in Figure 19. For driver installation, refer to the Atelier serial port driver video. Driver download links:

Click to play video on YouTube
- Windows driver download link: https://asa.atomstack.com/downloadWindowsDrivers.do3
- Mac driver download link: https://asa.atomstack.com/downloadMacDrivers.do3

Figure 19
-
Check for other software occupying the port: check whether any other software is currently connected to the machine's serial port. If so, please close them.
-
Check the operating system: on Windows OS, you can connect directly using the Type-C cable. On Mac OS, due to serial port access permissions, you need to use a docking station to convert and connect via the A port of the Type-C cable supplied with the machine, as shown in Figure 20. Note that some Type-C cables are for charging only and cannot transmit data. On Huawei computers, the C port also requires a docking station for conversion; the A port can be connected directly to the engraving machine.

Figure 20 -
Try using different software: try connecting the machine using AtomStack Studio or LightBurn.
-
Confirm that the connection cable is functioning properly: try using a Type-C cable that supports data transmission. If the machine can connect after replacing the cable, the issue is with the Type-C cable. Please provide a fault video and the device Serial Number (as shown in Figure 21) and send them to customer service for further handling.
Figure 21 -
Try using a different computer: try connecting the machine to another computer to see if it can connect normally. Note that for Windows 7, try multiple USB ports and ensure that the serial port driver is installed for each port.
-
If all the above steps fail, it is considered a mainboard failure: please send the troubleshooting steps, fault video, and device Serial Number to customer service for further handling. For replacement, please refer to the Atelier mainboard replacement video.
¶ 4. The Atelier Focusing Lens Is Dirty or Damaged.
Solution:
When there is a significant drop in power or a large change in the laser spot, the laser lens needs to be checked.
-
Dirt/Contamination: first, clean the lens using 99% pure anhydrous ethanol or a professional optical lens cleaner (avoid solvents containing ammonia or acetone). When wiping, use a lint-free cloth and wipe in a single direction (e.g., from the center outward in a spiral), avoiding back-and-forth rubbing that could scratch the lens. After cleaning, inspect the lens under strong side light to ensure no water stains or fibers remain. Please refer to the Atelier laser lens cleaning guide.
-
Damage: if the lens is damaged, the entire laser module must be replaced because it is a sealed structure. The probability of the focusing lens being damaged is very low. Unless there is a significant change in the laser spot, it is not recommended to disassemble the laser to check the focusing lens. Please refer to the Atelier laser replacement guide.
¶ 5. The Atelier Laser Cutting Capability Has Significantly Decreased.
Solution:
-
Normal power attenuation: as the laser is used over time, normal power attenuation will occur. This can be compensated by increasing the power or reducing the cutting speed.
-
Check the fixed focal distance of the laser: refocus the laser using the focusing knob on top of the machine so that the two red dots overlap on the surface of the material. The fixed focal height is 151 mm (distance from the galvo platform to the material surface).
-
Check parameter settings: confirm whether the parameters are correctly set according to the recommended parameter table. Note that the speed unit must be mm/min. How to view the Atelier parameter table: ① scan the QR code on the machine to view it; ② visit the official website: https://atomstack.com/pages/product-support; ③ request it from customer service.
-
Confirm the S-value max setting in the software: if you are using LightBurn, check whether the S-value max has been modified. Make sure it remains at 1000, as this value should not be changed (see Figure 22).

Figure 22 -
Check the sealed glass: check whether the sealed glass at the galvo scanner area is clean, as shown in Figure 23. If there are stains, clean it with alcohol and a lint-free cloth. Please refer to the "Enclosure Cleaning" section for the correct cleaning method. If the glass has stains that cannot be cleaned or if it is damaged, it needs to be replaced. Please refer to the Atelier sealed glass replacement guide.

Figure 23 -
Test the power adapter output: use a multimeter set to DC mode to measure whether the adapter output is 24V. If the output is abnormal, please provide a test video and the device Serial Number and send them to customer service for further handling.
-
Test the laser module status: use 100% power and a speed of 200 mm/min to make one cutting pass on 3 mm plywood to determine whether there is power attenuation. If it does not cut through and there is no visible mark on the back of the plywood, the laser module needs to be checked. Open the top cover of the Atelier and remove the laser module according to the Atelier laser lens cleaning video. Be careful not to let dust enter the galvo scanner assembly.

Click to play video on YouTube
- Check the laser lens: check whether the laser lens is clean. If it is dirty, clean it first using 99% pure anhydrous ethanol or a professional optical lens cleaner (avoid solvents containing ammonia or acetone). When wiping, use a lint-free cloth and wipe in a single direction (e.g., spiral from the center outward), avoiding back-and-forth rubbing to prevent scratches. After cleaning, inspect the lens under strong side lighting to make sure there is no remaining water stain or fiber. If the lens is damaged, the laser module must be replaced. Please provide clear photos of the damage and the device Serial Number to customer service.
- Test the laser spot: if the lens is clean, point the laser module toward the ceiling and fire it to check whether the laser spot is diffused or shows other abnormalities. If any abnormality is observed, please take clear photos of the laser spot and send them to customer service. Please refer to the Atelier laser spot inspection guide.
-
If none of the above shows any abnormalities, it is considered a laser module failure: please provide a cutting test video (clearly showing the parameter settings, cutting process, cutting result, and device Serial Number, as shown in Figure 24) and send it to customer service for further handling.
Figure 24
¶ 6. Poor Engraving Quality on Atelier.
Solution:
-
Check the fixed focal distance of the laser: refocus the laser using the focusing knob on top of the machine so that the two red dots overlap on the surface of the material. The fixed focal height is 151 mm (distance from the galvo platform to the material surface).
-
Check parameter settings: confirm whether the parameters are correctly set according to the recommended parameter table. Note that the speed unit must be mm/min. How to view the Atelier parameter table: ① scan the QR code on the machine to view it; ② visit the official website: https://atomstack.com/pages/product-support; ③ request it from customer service.
-
Confirm the S-value max setting in the software: if you are using LightBurn, check whether the S-value max has been modified. Make sure it remains at 1000, as this value should not be changed (see Figure 25).

Figure 25 -
Normal power attenuation: as the laser is used over time, normal power attenuation will occur. This can be compensated by increasing the power or reducing the cutting speed.
-
Check the sealed glass: check whether the sealed glass at the galvo scanner area is clean, as shown in Figure 26. If there are stains, clean it with alcohol and a lint-free cloth. Please refer to the "Enclosure Cleaning" section for the correct cleaning method. If the glass has stains that cannot be cleaned or if it is damaged, it needs to be replaced. Please refer to the Atelier sealed glass replacement guide.
Figure 26 -
Check the material: make sure the material is suitable for engraving with a diode blue laser. The surface of the material should have no coating or paint layer. If there is a paint layer, try engraving it one more time.
-
Test the laser module status: use 100% power and a speed of 200 mm/min to make one cutting pass on 3 mm plywood to determine whether there is power attenuation. If it does not cut through and there is no visible mark on the back of the plywood, the laser module needs to be checked. Open the top cover of the Atelier and remove the laser module according to the Atelier laser lens cleaning video. Be careful not to let dust enter the galvo scanner assembly.
- Check the laser lens: check whether the laser lens is clean. If it is dirty, clean it first using 99% pure anhydrous ethanol or a professional optical lens cleaner (avoid solvents containing ammonia or acetone). When wiping, use a lint-free cloth and wipe in a single direction (e.g., spiral from the center outward), avoiding back-and-forth rubbing to prevent scratches. After cleaning, inspect the lens under strong side lighting to make sure there is no remaining water stain or fiber. If the lens is damaged, the laser module must be replaced. Please provide clear photos of the damage and the device Serial Number to customer service.
- Test the laser spot: if the lens is clean, point the laser module toward the ceiling and fire it to check whether the laser spot is diffused or shows other abnormalities. If any abnormality is observed, please take clear photos of the laser spot and send them to customer service. Please refer to the Atelier laser spot inspection guide.
-
If none of the above shows any abnormalities, it is considered a laser module failure: please provide a cutting test video (clearly showing the parameter settings, cutting process, cutting result, and device Serial Number, as shown in Figure 27) and send it to customer service for further handling. Please refer to the Atelier laser replacement guide.
Figure 27
¶ 7. The Engraving Result on the Atelier Is Distorted.
Solution:
-
Confirm the material weight: lightweight materials can be blown by the strong suction of the Atelier exhaust fan. When engraving lightweight materials, the material should be secured — you can use the provided masking tape to stick it to the base plate or use the supplied positioning strips to hold it down.
-
Confirm that the galvo is calibrated: create a square file in the software and perform an engraving to check whether the result is correct. If distortion is observed, follow the steps below to calibrate in AtomStack Studio or LightBurn.
- Calibration in AtomStack Studio: open the software, click "Settings" → "Calibration" to enter the calibration interface (see Figure 28). Place the engraving material inside the machine and focus it properly. Click "Start" to engrave a 100 mm × 100 mm square. Measure the actual side lengths in the X-axis and Y-axis, then input these values into the "Galvo Calibration" interface in the "size coefficient calculation" section. For example, if the actual square measures 112 mm × 117 mm, input these values to obtain an X-axis ratio of 0.893 (see Figure 29). Repeat the same for the Y-axis. Please refer to the Atelier galvo calibration video.

Click to play video on YouTube

*Figure 28*

*Figure 29*
-
Y-axis of the frame is curved: in this case, the "Curve" parameter needs to be adjusted. The default Y-axis curve value is 1.060 (see Figure 28).
-
Calibration in LightBurn: please refer to the Atelier galvo calibration video. Note: when using LightBurn, go to "Device Settings" and set the "Origin" to the top-left corner (see Figure 30).

Figure 30
¶ 8. Atelier Door Detection Malfunction — the Status Indicator Lights Red Even When the Enclosure Door Is Closed.
Solution:
-
Confirm that the enclosure door is fully closed: check whether the door is being blocked by materials and cannot fully close.
-
Check the Hall sensor: in AtomStack Studio, go to Settings and turn off the "Door Detection" function (see Figure 31). If the status indicator changes from red to solid green after disabling this function, it indicates a Hall sensor failure. For replacement, please refer to the Atelier Hall sensor replacement video.
Figure 31 -
If the above steps do not resolve the red light issue: please provide a photo of the Serial Number (as shown in Figure 32) and a fault video to customer service to request the Atelier firmware for updating the machine. If the issue persists after updating the firmware, attempt a mainboard replacement. For guidance on replacing the mainboard, please refer to the Atelier mainboard replacement video.
Figure 32
¶ 9. Atelier Suddenly Stops During Operation.
Solution:
-
Test the power adapter output: use a multimeter set to DC mode to measure whether the adapter output is 24V, 3A. If the output is abnormal, please provide a test video and the device Serial Number (as shown in Figure 33) and send them to customer service for further handling.
Figure 33 -
Check for alarm prompts: observe whether the status indicator lights red or whether the software displays an alarm.
-
USB key not inserted prompt: check whether the USB key is properly inserted. Gently adjust it and see if the indicator light turns flashing green. If it flashes green, press "Start/Pause" to continue the previous engraving. If the prompt persists, please provide a fault video and the device Serial Number to customer service for further handling.
-
Connection lost prompt:
- Confirm the Type-C cable is properly connected: turn off the machine, reconnect the cable, and power it on again. On Mac, due to serial port access permissions, use a docking station to connect via the A port of the Type-C cable supplied with the machine (see Figure 34). Note: some Type-C cables for phone charging cannot transmit data and cannot be used for connection.
- Check the port: try connecting to a different COM port on the computer and install the serial port driver. Pay special attention to Windows 7, which has poor compatibility. Driver download links:
- Windows driver download link: https://asa.atomstack.com/downloadWindowsDrivers.do3
- Mac driver download link: https://asa.atomstack.com/downloadMacDrivers.do3
- Check the software: try using AtomStack Studio (PC or mobile) or LightBurn to see if the sudden stop occurs in all cases.
- If none of the above resolves the connection lost issue: attempt a mainboard replacement. Please provide the fault video, troubleshooting steps, and device Serial Number to customer service. For guidance, refer to the Atelier mainboard replacement video.
Figure 34 -
Prompt: $door/enable=On — enclosure detected as open:
-
Confirm that the enclosure door is fully closed: check whether the door is being blocked by materials and cannot fully close.
-
Check the Hall sensor: in AtomStack Studio, go to Settings and turn off the "Door Detection" function (see Figure 35). If the status indicator changes from red to solid green after disabling this function, it indicates a Hall sensor failure. For replacement, please refer to the Atelier Hall sensor replacement video.
Figure 35
-
-
-
If none of the above resolves the issue: attempt a mainboard replacement. Please provide the fault video, troubleshooting steps, and device Serial Number to customer service for further handling. For guidance on replacing the mainboard, refer to the Atelier mainboard replacement video.
¶ 10. When Processing Lightweight Materials on the Atelier, the Output May Show Missing or Distorted Lines.
Solution:
The cause is that the strong airflow from the exhaust fan can move lightweight materials.
-
Use the provided masking tape to secure the material to the base plate.
-
Use the provided positioning strips to hold the material in place. The positioning strips have limitations, so the method of securing should be determined based on the size of the material.
¶ 11. Atelier Cannot Connect via WiFi.
Solution:
-
Check the router: the Atelier WiFi only supports 2.4 GHz. It cannot connect to a 5 GHz network. Switch the router to 2.4 GHz and try again.
-
Connect via mobile hotspot: if there is no 2.4 GHz router or no WiFi network available, you can use a mobile hotspot to connect and control the Atelier. For connection instructions, refer to the Atelier mobile connection video.

Click to play video on YouTube
- Check the WiFi signal: use your phone to search for WiFi and see if a network named Atelier_***** appears, and check the signal strength.
- WiFi signal is strong: try using another phone or turn off mobile data and attempt to connect again.
- WiFi network not found: if the network cannot be found on any phone, please provide a fault video and the device Serial Number to customer service to request the corresponding firmware. Reflash the firmware and try to connect again. If it still cannot connect, contact customer service to arrange a mainboard replacement. For guidance, refer to the Atelier mainboard replacement video.
- WiFi signal is weak: check the WiFi antenna by opening the top cover of the Atelier. Ensure the WiFi antenna is properly connected to the mainboard. Reconnect it if necessary. If the signal remains weak after reconnecting, the WiFi antenna is faulty. Please provide a fault video and the device Serial Number (see Figure 36) to customer service for further handling. Refer to the Atelier WiFi antenna replacement video.

Click to play video on YouTube

*Figure 36*
¶ 12. The Atelier Does Not Close Vector Lines During Engraving.
Solution:
-
Check the engraving file: create a square or circular line file in the software and perform a test engraving. If the lines close correctly, the issue is caused by the original engraving file.
-
Check the focus: refocus the laser using the focusing knob on the side top of the laser so that the two red dots overlap on the material surface. The fixed focal height is 151 mm (distance from the galvo platform to the material surface).
-
Check the parameter settings: confirm whether the parameters are correctly set according to the recommended parameter table. Note that the speed unit must be mm/min. How to view the parameter table: ① scan the QR code on the machine to view it; ② visit the official website: https://atomstack.com/pages/product-support; ③ request it from customer service. If the parameter settings are correct, try reducing the speed or increasing the power.
-
Enable "Constant Power": in AtomStack Studio, see Figure 37; in LightBurn, see Figure 38.

Figure 37
Figure 38 -
Increase the $31 minimum power value: use AtomStack Studio or LightBurn to send the command $31=* ("*" represents a specific value; you can gradually increase this value until the lines fully close). For example, if the lines do not close when $31 = 0, send $31 = 10. If the lines are still not closed, continue increasing the value and send $31 = 20, and so on until the lines fully close. For the operation steps, please refer to the Atelier tutorial video on adjusting the minimum power value.
¶ 13. The Atelier Exhaust Performance Is Poor, and the Enclosure Is Filled With Smoke.
Solution:
-
Check the exhaust duct: carefully inspect the exhaust duct for kinks or blockages.
-
Check the fan: open the enclosure and remove the fan cover by unscrewing the two screws on the fan partition.
- Fan is heavily dusty: clean the fan according to the Atelier fan cleaning video.
- Fan does not rotate: open the top cover of the Atelier and check whether the fan connector is properly plugged in. Reconnect if necessary. If the fan still does not rotate, disconnect the fan connector and use two wires to connect the fan directly to the adapter (see Figure 39) to test whether it rotates normally. If it still does not rotate, provide a troubleshooting video and the device Serial Number (see Figure 40) to customer service for further handling. For fan replacement, refer to the Atelier fan replacement video.

Click to play video on YouTube

*Figure 39*

*Figure 40*
¶ 14. Mirror or Reversed Output When Using a Rotary With Atelier.
Solution:
-
Check whether the engraving file is mirrored: if yes, check whether the mirror function is enabled in the software settings. If it is enabled, please disable it. If it is disabled, try enabling it. For reference: see Figure 41 in AtomStack Studio and Figure 42 in LightBurn.

Figure 41
Figure 42 -
Restore factory settings:
-
To restore factory settings in AtomStack Studio: in version 2.20 or above, click 7 times consecutively on the Version Number: V.2.20 (client version) to enter Developer Mode (see Figure 43). Go back to the menu bar and open "Serial Port Log" in Developer Mode, then click "Reset" to restore factory settings (see Figure 44).

Figure 43
Figure 44 -
In LightBurn: enter the command $RST=* in the console command input box to restore factory settings (see Figure 45).

Figure 45
-
¶ 15. Atelier Does Not Work Properly After Connecting the Rotary Attachment.
Solution:
-
Check the connection: Atelier only supports the R6 / R8 / R8 PRO rotary attachments, which must be connected via the supplied USB cable (see Figure 46). Note: make sure not to plug into the wrong port — it must be connected to the Accessory port on the Atelier machine.

Figure 46 -
Check the settings:
-
When using LightBurn, configure the following: Rotary type: for R6 select Roller, for R8 select Chuck. Rotary axis: select Y-axis. Parameters: R8 — speed = 160 mm/rev (fixed), enter either the material diameter or circumference; R6 — speed = 50 mm/rev (fixed), rotary diameter = 16 mm (fixed), enter either the material diameter or circumference (see Figure 47).

Figure 47 -
When using AtomStack Studio: Roller (R6) — no parameter settings are required. Chuck (R8) — you need to enter either the material circumference or diameter (choose one) (see Figure 48).

Figure 48
-
¶ 16. Atelier Cannot Recognize USB Drives or TF Cards.
Solution:
-
Test recognition function: since the USB drive or TF card is internally connected to the mainboard, you can only check its functionality through AtomStack Studio by navigating to File → Open Device USB Drive to see if the storage function works properly, and whether the size of the storage space is compatible with the available space on the USB drive or TF card (see Figure 49).

Figure 49 -
Reinsert the USB/TF card: turn off the machine, open the top cover, remove the USB drive or TF card, and then reinsert it. Refer to the Atelier USB/TF card replacement video for guidance.

Click to play video on YouTube
-
Format the USB/TF card: if reinserting does not resolve the issue, insert the USB drive or TF card into a computer and format it to FAT32.
-
Replace the USB/TF card: try using another USB drive or TF card. If the new card works properly, the original is considered defective. You can send a video of the fault along with the device Serial Number (see Figure 50) to customer service for assistance.
Figure 50 -
Replace the mainboard if necessary: if the USB drive or TF card can be recognized and read/written normally on a computer, and formatting does not resolve the issue, the mainboard needs to be replaced. Please send a video of the fault, the troubleshooting steps taken, and the device Serial Number to customer service for assistance. For replacement instructions, refer to the Atelier mainboard replacement video.
¶ 17. Atelier Firmware Upgrade Failed.
Solution: if a new firmware update pushed by AtomStack Studio (PC or mobile version) fails, try the following steps:
-
Atelier cannot recognize the USB/TF card: refer to the section "Atelier Cannot Recognize USB Drives or TF Cards" for troubleshooting.
-
Cannot flash the same firmware repeatedly: check whether the firmware you are trying to flash is the same as the current firmware version on your Atelier. If you are unsure, take a screenshot and send it to customer service for confirmation. To check the firmware version, see Figure 51.

Figure 51
¶ 18. Atelier Dual Red Lights Do Not Overlap During Focusing.
Solution:
-
Check the focusing distance: if the material has been placed but the distance has not been adjusted, readjust it. Make sure the overlap point aligns with the center point on the same horizontal line (see Figure 52).

Figure 52 -
Adjust the red light angles: set the galvanometer platform to a height of 151 mm from the base plate. Then adjust the angle of one red light so that its red dot falls on the horizontal line to the right of the base plate center (recommended within 1–2 mm). Lock the screw, then adjust the angle of the other red light so that it overlaps with the first red dot. Refer to the Atelier Red Light Positioning Calibration video for guidance.

Click to play video on YouTube
¶ 19. Atelier Camera Misalignment.
Solution:
-
Check the focusing distance: after placing the material, readjust the distance so that the two red dots overlap on the material surface and align horizontally with the center point.
-
Realign the camera: the camera is factory-calibrated before shipment. When using AtomStack Studio, the user only needs to perform camera alignment. Since there is no built-in illumination in the enclosure, use a flashlight or other light source to illuminate the interior during capture. The smaller the captured values, the better. When using LightBurn, follow its default procedure for camera calibration. Refer to the Atelier AtomStack Studio Camera Calibration video and the Atelier LightBurn Camera Calibration video for guidance.

Click to play video on YouTube
¶ 20. Atelier Camera Malfunction.
Solution:
-
Check if the camera is disabled: open the Device Manager to see if the camera is restricted or disabled. Remove any restrictions and enable permissions as needed (see Figure 53).

Figure 53 -
Check the camera connection to the mainboard: if the camera cannot capture images, check whether the camera cable is loose (see Figure 54). Use tweezers or a similar tool to disconnect and reconnect the cable, then test the camera function again.
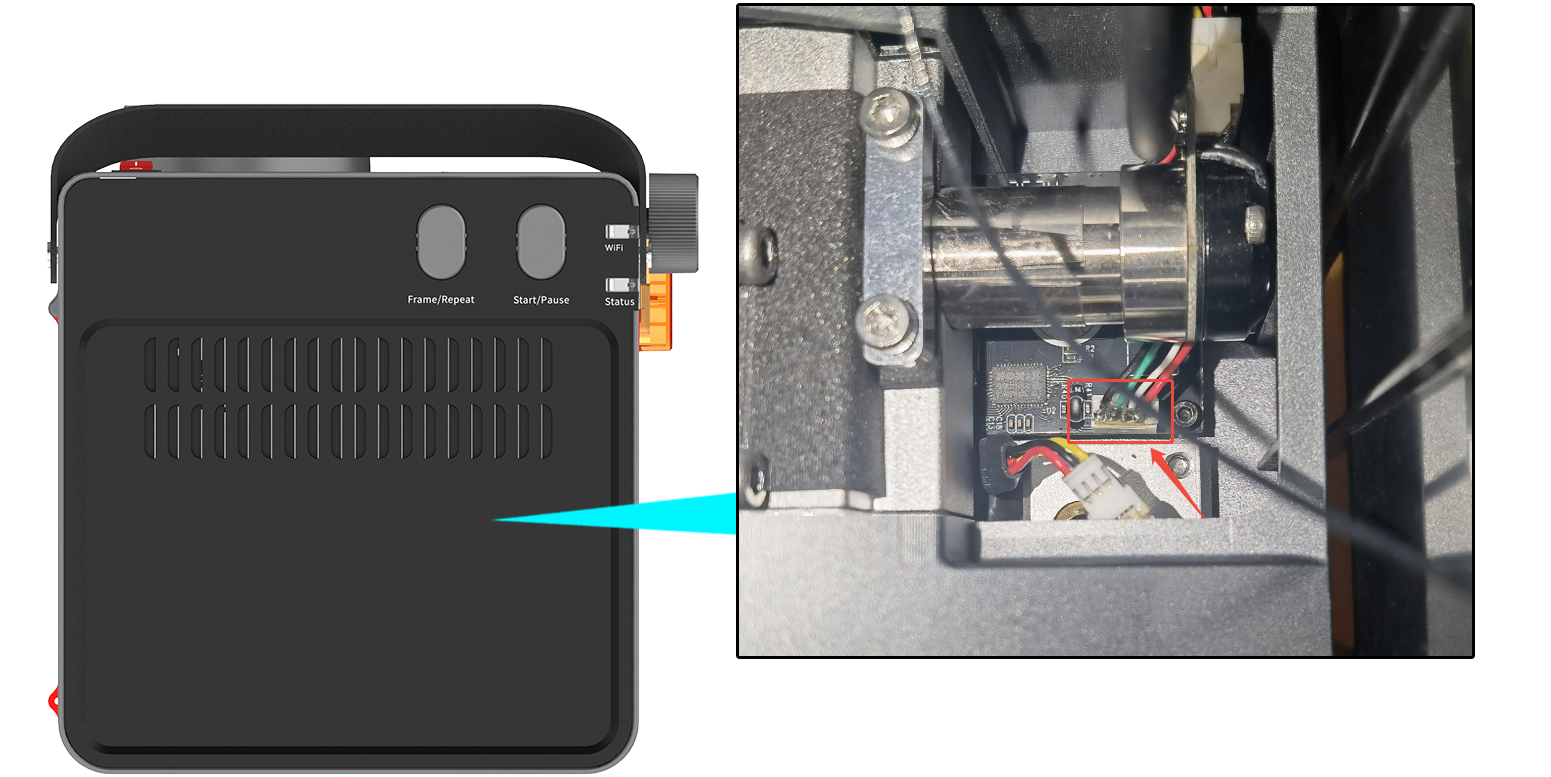
Figure 54 -
Replace the camera if necessary: if the above steps do not resolve the issue, the camera is considered faulty. Replace the camera following the Atelier Camera Replacement video instructions.